My new car!

Talk about your Rotaries!
User avatar
chickenwafer
Posts: 2515
Joined: Wed Mar 11, 2009 9:14
Location: Greeley

Postby chickenwafer » Fri Nov 18, 2011 9:14

The other housing is finished and it looks stellar. I think my engine is going to look outstanding. I got so excited I stacked the irons and housings. Enjoy my propritary baller status engine paint job. Now Eric, tell me this doesn't looks good!

Boom

Image

Image

Image


And this is what a rotary engine looks like inside, haha:

Image

Side note; isn't it amazing that an engine that can make over 1000rwhp can be set on my work bench with room to spare and picked up by one person? Because rotary!!!
:eek:

User avatar
VRx8
Senior Member
Posts: 755
Joined: Sat Jul 04, 2009 9:14
Location: San Antonio, TX

Postby VRx8 » Fri Nov 18, 2011 9:14

Wow good job, sand the "13B" in the housings too!

User avatar
chickenwafer
Posts: 2515
Joined: Wed Mar 11, 2009 9:14
Location: Greeley

Postby chickenwafer » Fri Nov 18, 2011 9:14

VRx8 wrote:Wow good job, sand the "13B" in the housings too!


Thanks man. I thought about sanding the 13B but it's much smaller so more difficult to sand without damaging the finish around it. I might try it anyways though haha, just not sure if it will look good or not.
:eek:

User avatar
speedjunkie
Senior Member
Posts: 5337
Joined: Wed Jan 02, 2008 9:14
Location: Colorado Springs
Contact:

Postby speedjunkie » Fri Nov 18, 2011 9:14

It doesn't look good.


jk, I can't even see pics on this computer LOL. Eduardo is right though, a sanded 13B on the housings would look trick.

I like "because rotary" though haha.
Image

User avatar
iani1.1
Posts: 1942
Joined: Sun Oct 19, 2008 9:14
Location: ATX
Contact:

Postby iani1.1 » Fri Nov 18, 2011 9:14

mmm black and purple. awesome scheme
Image

User avatar
speedjunkie
Senior Member
Posts: 5337
Joined: Wed Jan 02, 2008 9:14
Location: Colorado Springs
Contact:

Postby speedjunkie » Sat Nov 19, 2011 9:14

Ooh I can see pics now. Looks good! I really like the sanded off Mazda name. The 13B would look cool sanded off too, but it looks cool just the way it is too.

The paint came out looking good.
Image

User avatar
chickenwafer
Posts: 2515
Joined: Wed Mar 11, 2009 9:14
Location: Greeley

Postby chickenwafer » Sat Nov 19, 2011 9:14

Thanks guys. I'm pumped, it looks awesome. I think it's going to go well with the wrinkle black LIM, UIM, TB and TB elbow. Plus the front cover will be black and the alt will be polished. And of course my TiAL wastegate and BOV are the same purple so it will flow real well.
:eek:

User avatar
chickenwafer
Posts: 2515
Joined: Wed Mar 11, 2009 9:14
Location: Greeley

Postby chickenwafer » Sun Nov 20, 2011 9:14

So I FINALLY finished with my AST delete haha. I tried (and massively failed) to remove the AST nipple on the thermostat housing by heating up the neck with my MAP gas torch and then using my vise to pull it out....um, no. That did not work. It's simply pressed in too tight.

On to Plan B (or what I call, "what I should have originally done"). I used my dremel with a cutting wheel to cut the nipple off flush with the housing. I then used my stepped bit to drill out the remaining part of the nipple still pressed in the housings. This was kind of a mistake, tho, because the stepped bit opened the hole up too quickly. I forgot the thermostat housing is aluminum so the titanium bit would drill through it pretty quickly.

Still, the rest of the nipple came out so then I used a 7/16-14 tap to put some threads in it:

Image

Image

I originally wanted a flush allen head set screw but my local Ace hardware didn't have a 7/16-14 set screw of course...I think biggest they had was 1/2-14. So I settled for a 7/16-14 button head allen. I then applied a generous amount of liquid-proof gasket sealant:

Image

And torqued it home:

Image

I could have left it like this, but I thought that big allen head cap on it looks pretty stupid, so I again busted out the dremel with the high speed cutting wheel and cut the head off of the cap bolt:

Image

I sanded it down a little more so now it's all ready for paint. Overall I'm pretty happy with how it turned out, and IMO it looks better than a hose with a bolt in it or a vacuum cap plug solution.

While I was in the garage I took the opprotunity to tap my primary fuel rail with 1/4-18 NTP threads so I can install a -6AN adapter fitting in both ends for my braided SS AN hose fuel system:

Image

Image

Image

Tapped both ends and blew out the rail with compressed air. Primary rail is now done and ready for paint as well.


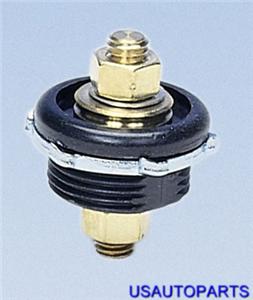
In less exciting news (not that tapping some random parts is exciting tho haha) I needed another fuel pump "sock" or strainer (whatever it's called) for my dual pump setup so I went to AutoZone to get one. They didn't have any in stock at that store but I could drive 30 minutes to get one...ok, but it was $30 bucks and I needed two of them so I'd have to drive to two separate stores because each store only had 1 in stock WTF? Plus, $30 for a little filter? I looked it up and Summit Racing had the same exact part for $9.99 plus $4 ship so yeah I went that route.

This is what I'm talking about:

Image

Also ordered a pass-thru electrical bulkhead connector to get power into the dual pump in the tank and bypass the OEM POS 16-gauge cat-hair wiring:

Image

So once those parts get in from Summit I can drop in the fuel pump assemble and that's done!
:eek:

User avatar
speedjunkie
Senior Member
Posts: 5337
Joined: Wed Jan 02, 2008 9:14
Location: Colorado Springs
Contact:

Postby speedjunkie » Sun Nov 20, 2011 9:14

Dude, I find modifying stuff like that pretty exciting haha. I like capping off that coolant port like that and I was getting excited about doing it myself this next time haha. I just hope I can do it without wrecking the powder coat that's already on there haha, and I'll leave the bolt head too because I'm not as anal as you LOL!

Are you going to paint the fuel rail in that purple color too?

On thing with the wiring for the fuel pump setup, I've read a few threads where guys did this about having wiring that is good for fuel as well. Basically something that will hold up. I like the bulkhead fitting though, those are awesome. Are you going to put rubber gaskets on each side of the fitting or do you think it will seal well enough. I just hate having to find stuff like that that is fuel rated, ya know? Such a PITA.
Image

User avatar
chickenwafer
Posts: 2515
Joined: Wed Mar 11, 2009 9:14
Location: Greeley

Postby chickenwafer » Mon Nov 21, 2011 9:14

Yeah, finding fuel rated stuff has become my life lately doing this fuel pump setup LOL.

About the bulkhead sealing, it has two rubber grommets on each sides of each, but Ive heard some still complain of a fuel smell with it so I'm going to still use some fuel rated gasket goop to make sure it's sealed 100%.

Yeah, I am planning on painting the fuel rails purple. Or black, can't decide, but I'm 90% purple. Not like you can see them anyways haha. Well I guess you can see the front of the secondary rail a little but that's it.
:eek:

User avatar
chickenwafer
Posts: 2515
Joined: Wed Mar 11, 2009 9:14
Location: Greeley

Postby chickenwafer » Sun Nov 27, 2011 9:14

Not really an update but I still haven't received the Himni motor mounts or SS engine bolt kit I ordered on 11/18. I haven't even got an email from them. I fired off an email today so hopefully I will hear back, or I'll have to file a PayPal dispute.

Edit: a quick search on 7club reveals Himni is pretty hit or miss with service. Looks like I'll be filing a PayPal dispute by mid week if I don't hear anything since I only have 45 days to file a dispute.

I got the fuel system parts in from Summit. The bulkhead requires a 1 1/4" hole and of course I don't have a bit that big. So I go to Walmart (only place open on Thanksgiving) and got a hole saw kit. Within 30 second of drilling the el-cheapo hole saw breaks. So now I have a half ####ed up hole I need to try and use my carbide bits to mill out the hole. This is stupid frustrating, installing this shouldn't be this difficult!

I also need to pick up some electrical crimp connectors to finish the in-tank wiring.
:eek:

User avatar
VRx8
Senior Member
Posts: 755
Joined: Sat Jul 04, 2009 9:14
Location: San Antonio, TX

Postby VRx8 » Sun Nov 27, 2011 9:14

I haven't heard anything from Himni either, I did order the water pump bolts bolt from other website. If hear anything this week i'll go ahead and file a Paypal dispute.

User avatar
speedjunkie
Senior Member
Posts: 5337
Joined: Wed Jan 02, 2008 9:14
Location: Colorado Springs
Contact:

Postby speedjunkie » Sun Nov 27, 2011 9:14

I got a whole saw (with a guide bit) from Lowe's when I did mine on the tranny tunnel, it cut right through with no problem. I can't believe the hole saw would break, usually they're pretty sturdy.
Image

User avatar
chickenwafer
Posts: 2515
Joined: Wed Mar 11, 2009 9:14
Location: Greeley

Postby chickenwafer » Sun Nov 27, 2011 9:14

It was a cheap Black & Decker bit from WalMart. It broke two teeth on the bit, kind of BS.
:eek:

User avatar
speedjunkie
Senior Member
Posts: 5337
Joined: Wed Jan 02, 2008 9:14
Location: Colorado Springs
Contact:

Postby speedjunkie » Sun Nov 27, 2011 9:14

Did it have the guide bit for the center? When I drilled mine I had already tried to drill the hole with a bit larger than the guide bit, so it wasn't much help with the hole saw haha.
Image


Return to “Rotary Vehicle”

Who is online

Users browsing this forum: No registered users and 43 guests