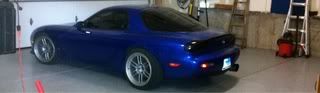
My new car!

-
chickenwafer
- Posts: 2515
- Joined: Wed Mar 11, 2009 9:14
- Location: Greeley
-
speedjunkie

- Senior Member
- Posts: 5337
- Joined: Wed Jan 02, 2008 9:14
- Location: Colorado Springs
- Contact:
-
chickenwafer
- Posts: 2515
- Joined: Wed Mar 11, 2009 9:14
- Location: Greeley
-
chickenwafer
- Posts: 2515
- Joined: Wed Mar 11, 2009 9:14
- Location: Greeley
I was bored today so I pulled out those low mileage twins I bought and decided to do a cosmetic refurbishing on them. Since they are mechanically fine, but looked a little tired, and I have the time, I figured I could make them look like new.
I took plenty of pictures, which is rare for me since I hate stopping work to take pics, which I will upload once the high temp paint is done curing. I do think they came out REAL nice and look basically brand new.
While they were apart I also took the time to convert the twins to non-sequential by removing the turbo pre-control flapper in the secondary runner and sealing it up with a bolt. I was going to weld it up but I haven't welded cast iron yet and didn't feel comfortable experimenting on a set of good condition twins haha.
Pictures to come!

-
chickenwafer
- Posts: 2515
- Joined: Wed Mar 11, 2009 9:14
- Location: Greeley
Twin Turbo Rehab!!
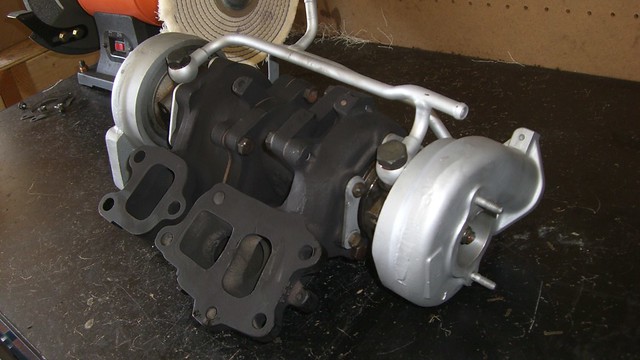
Here is what I started with; 22,000 mile USDM Spec NC31 stock twin turbos, still sequential:

Minimal cracking....

Took the hard water lines off:

Wastegate and Pre-Control acuators off, water lines and banjo bolts, etc:

Secondary turbo unbolted from downpipe collector:

Better picture of the secondary turbo cartridge:

Had one bolt (Just one!) on the primary turbo cartridge that didn't want to bust loose, so out came the MAP gas torch:

All apart- secondary turbo cartridge- downpipe collector - primary turbo cartridge:

All teh parts laid out:

Primary turbo wastegate:

Turbine housings came off next: Primary turbo:

And the housing:

Secondary turbo:

And it's housing with the pre-control flapper still in:

Here is what I started with; 22,000 mile USDM Spec NC31 stock twin turbos, still sequential:
Minimal cracking....
Took the hard water lines off:
Wastegate and Pre-Control acuators off, water lines and banjo bolts, etc:
Secondary turbo unbolted from downpipe collector:
Better picture of the secondary turbo cartridge:
Had one bolt (Just one!) on the primary turbo cartridge that didn't want to bust loose, so out came the MAP gas torch:
All apart- secondary turbo cartridge- downpipe collector - primary turbo cartridge:
All teh parts laid out:
Primary turbo wastegate:
Turbine housings came off next: Primary turbo:
And the housing:
Secondary turbo:
And it's housing with the pre-control flapper still in:
-
chickenwafer
- Posts: 2515
- Joined: Wed Mar 11, 2009 9:14
- Location: Greeley
Removing surface rust of secondary turbine housing:

The two compressors together:

Again...

Next I used VHT Brand "Flame Proof" enamel spray paint to paint the turbo compressor housings, turbine housings, downpipe collector, w/g actuator, water hard lines, etc.
Then came the lengthy process of curing the enamel by baking the pieces in an oven in 3 separate stages and different temperatures. I didn't take any pictures of this because it was rather boring.
Turbos fresh out of the oven after the last stage of curing:


All of teh parts laid out for reassembly:

I used black for the exhaust parts. It's much darker in person but the flash of the camera makes it look like charcoal for some reason:

This picture captures the more true color of the black:

Bolted secondary turbine housing to downpipe collector. You can also see the pre-control flapper was cut out prior to painting. I guess I forgot to takes pictures of this :
:

Pre control door bolted on. I used a silver Sharpie to mark which bolts I had torqued:

The entire assembly (turbine housings and downpipe collector) all assembled minus the CHRA's:

CHRA's and compressor housings, along with one water hard line, all bolted up:

Another angle:

Both water lines bolted up:

Finished:


And finally, a good before and after comparo:
Before:
After:

Not bad for some paint and a couple hours worth of work! If anyone else wants this done to their twins, just let me know.
The two compressors together:
Again...
Next I used VHT Brand "Flame Proof" enamel spray paint to paint the turbo compressor housings, turbine housings, downpipe collector, w/g actuator, water hard lines, etc.
Then came the lengthy process of curing the enamel by baking the pieces in an oven in 3 separate stages and different temperatures. I didn't take any pictures of this because it was rather boring.
Turbos fresh out of the oven after the last stage of curing:
All of teh parts laid out for reassembly:
I used black for the exhaust parts. It's much darker in person but the flash of the camera makes it look like charcoal for some reason:
This picture captures the more true color of the black:
Bolted secondary turbine housing to downpipe collector. You can also see the pre-control flapper was cut out prior to painting. I guess I forgot to takes pictures of this
:
Pre control door bolted on. I used a silver Sharpie to mark which bolts I had torqued:
The entire assembly (turbine housings and downpipe collector) all assembled minus the CHRA's:
CHRA's and compressor housings, along with one water hard line, all bolted up:
Another angle:
Both water lines bolted up:
Finished:
And finally, a good before and after comparo:
Before:
After:
Not bad for some paint and a couple hours worth of work! If anyone else wants this done to their twins, just let me know.
-
yoojeankim

- Posts: 114
- Joined: Wed May 11, 2011 9:14
- Location: lakewood
- Contact:

-
chickenwafer
- Posts: 2515
- Joined: Wed Mar 11, 2009 9:14
- Location: Greeley
Thanks Dan!
You really only need to port the actual wastegate, the pre-control won't be much of any benefit if you port it. And for me, I am going non-sequential for simplicity, so it's moot.
I decided not to port the wastegate because that's really only for people who get boost creep and can't control boost...I want to run a minimum of 12psi so it's not really a problem for me since I'm running more than stock boost. Plus, I won't have the w/g pill in the hose, just an MBC, so no need to port the w/g (for me).
Also, I'm so happy with the results of the silver enamel I'm debating painting the UIM with it now instead of hand polishing it like I originally planned. It would be MUCH easier but the polished aluminum looks better IMO, plus it will match my charge piping. Guess I will decide once I get the UIM off.
-
speedjunkie
- Senior Member
- Posts: 5337
- Joined: Wed Jan 02, 2008 9:14
- Location: Colorado Springs
- Contact:
Looks good! Too bad you'll only see the front turbo LOL.
I had a thought though. The new GTX turbos from Garrett have more blades, correct? I wonder if anyone makes wheels small enough for our stock turbos that would have the same innovations as the new turbos coming out. If they did, then all we'd need is a lighter manifold made of something else and we'd be set.
I had a thought though. The new GTX turbos from Garrett have more blades, correct? I wonder if anyone makes wheels small enough for our stock turbos that would have the same innovations as the new turbos coming out. If they did, then all we'd need is a lighter manifold made of something else and we'd be set.

-
chickenwafer
- Posts: 2515
- Joined: Wed Mar 11, 2009 9:14
- Location: Greeley
That's a good idea, fitting a billet compressor wheel in the stock turbo housing. Bryan at BNR already fits GT28 CHRA's and with compressors to the stock turbos and Garrett is set to release a GTX28 so it should be possible.
I think BNR's are over rated, however. The most they've ever made is 423rwhp non-seq IIRC, and a guy just made 412rwhp on stock twins. Not worth it IMO. But with billet compressors, we could see around 500rwhp on stock twins. Biggest issue at that point is exhaust backpressure in the manifold and just general flow through that brick. Plus, being cast, it's less than idea for high horsepower applications.
I think BNR's are over rated, however. The most they've ever made is 423rwhp non-seq IIRC, and a guy just made 412rwhp on stock twins. Not worth it IMO. But with billet compressors, we could see around 500rwhp on stock twins. Biggest issue at that point is exhaust backpressure in the manifold and just general flow through that brick. Plus, being cast, it's less than idea for high horsepower applications.
-
chickenwafer
- Posts: 2515
- Joined: Wed Mar 11, 2009 9:14
- Location: Greeley
Also, I can't wait to go non-sequential and get these new turbos in there. My primary turbo is soooo lazy it's not even funny anymore. I did more tuning today cleaning up cruise areas and it was running rich at high RPM, so I was logging on the laptop trying to find the areas I need to fix.
I knew my primary turbo was lazy, but now it's crazy. Reviewing the log, I don't get positive manifold pressure until 3200rpm! On sequential twins! It should be more like 2400rpm. Plus, once it starts to spool, it spools so slow I only get around 8psi out of it, so at transition when the secondary kicks in, it shoots to 13psi and the car feels like a semi nuclear device has been detonated behind it and it takes off.
So my twins are basically spooling as quick as non sequential twins anyways, so I'm not worried about going non-sequential. I'm looking forward to not having random boost issues, cleaning up the engine bay, not worrying about parts failing, and not having an aggressive boost spike at 4500rpm haha.
The good news is I got the cruise map pretty nailed down, hitting 15-15.5AFR in cruise so I'm happy with that. Also running great in boost so I'm happy with how it's running (besides the primary turbo haha).
-
speedjunkie
- Senior Member
- Posts: 5337
- Joined: Wed Jan 02, 2008 9:14
- Location: Colorado Springs
- Contact:
That's why I was saying it would be best to have a different kind of manifold, or at least one made of a different material, then maybe ported or something.
Sounds like you are hating stock turbos haha.
My car is still dying from time to time and still hitting 9s sometimes too, for some reason (under very light cruise), AND hunting for idle. Can you email me the info I need to make some changes like we were talking about?
Sounds like you are hating stock turbos haha.
My car is still dying from time to time and still hitting 9s sometimes too, for some reason (under very light cruise), AND hunting for idle. Can you email me the info I need to make some changes like we were talking about?
Who is online
Users browsing this forum: No registered users and 76 guests