Upgrade...... Pshhhh!

Talk about your Rotaries!
User avatar
GR-8
Posts: 5335
Joined: Thu Oct 11, 2007 9:14
Location: Denver/ Lakewood
Contact:

Upgrade...... Pshhhh!

Postby GR-8 » Mon Jun 28, 2010 9:14

So I did it. After 6yrs I finally got boost! Getting tuned in a week or 2! Running a base tune right now. I've had the kit sitting at my brohters since Feb. (I know right) Huge thanks to Dave (Chickenwafer) for the txt/online/phone support and my Brother for the help and fab. work and use of his garage.

The Kit:
Yep,...... it's the kit I have put down and bashed a lot on here. Most of you probably remember it and I said I'd never buy this kit because for 4k (at that time) you'd only be making measly power over stock.

Well times have changed havn't they. This Greddy kit is not the stock greddy kit nor is it Chickenwafer's old Greddy GT3071R Kit. (Missed that deal by a few hours) This is the stock Greddy turbo with upgraded internals. IIRC it has upgraded turbine and compressor wheels, clipped turbine wheel, and ported wastegate. Couplers and hose clamps have also been swapped out for higher quality ones. The previous owner of the kit was putting down 282RWHP and 242WTQ with a rich tune, WG issues, and stock injectors. He never dynoed after fixing the WG and upgrading the injectors but felt a noticable bump in power.

Install:
Everything for the most part went really smooth. I'll tell you what, doing this install on a lift makes it 40x's faster than trying to do this install on the ground, on a steep driveway. (RX-7Chris and RX8Ghost know what I speak of)

The turbo and exhaust manifold install was a breeze. There were struggles with fitting some pipes to the turbo because of tight quarters under the 8 but it wasn't too bad. All major componentes (Exhaust Mani., Turbo, and Pipng) went on rather quickly. Most time consuming process was actually putting all the small parts together and doing some custom fabrications done by my brother. Doing the injector install took me some time.

Install was done at my most favorite shop of all. My brothers house.

Fabrication Work:
Well we wasted a good deal of time on a wild goose chase for a day or two trying to find a adapters for the Greddy Oil Filter Adapter Plate. The threads were metric and the threads I got from my gauges to run my Oil Temp and Pressure were Standard thread. After a day of searching there is nowhere that sells Metric to standard adapters. So in the end we tapped and re-threaded the holes slightly larger to accept the Standard adapter my gauges came with.

The second thing we needed to fix was the oil return for the turbo. Greddy wants you to use their fitting that screws into the oild drain plug. Well the guy I got the kit from didn't send that peice. He accidentaly sent it out with his Greddy Oil Pan he had sold. Go figure that no hardeware store or shop has metric barb. (Now that I think about it I thin an Import shop would have had what I needed.) Well we got a bung and a 5/8 barb from Ontrack (Off Santa Fe and Dartmouth.) We welded a bung in to the oil pan next to the oil drain plug. Our first attempt at it was an epic fail. We were so tired that we welded the bung in bass ackwards. (It's only threaded partway through. Woops. After scrapping ideas of how to cut it out and start again we came to the conclusion that you can't without destroying the pan. So we wasted another day calling around yards for a used pan. We even called dealers to see if they had any used pans lying around. Best they had was a new pan that was 3 days away (Special order) for $2xx or Overnighted for another $30. After talking to our buddy at buds muffler he said, "why not use a hole saw?" Light bulbs clicked and we ran out and got a new bung and a hole saw. We drilled out the old bung and viola, epic fail fixed.

The next thing we did was chop up the Mazdaspeed Intake. One cut and we had what we needed. The original plan was to custom make a pipe and not cut the MS intake pipe but we decided to take the easier route.

We also fabbed new brackets to bring the intercooler under the bumper bar, instead of behind it, and more forward. I'ts not the exact way I would like it but it works. This needed to be done to allow the MS intake filter to fit in it's intended location.

Picutres:

Test fit of teh IC at my house with the Greddy Brackets.
Image
Image

Custom IC Brackets
Image

The Epic Fail and finished return line
Image
Image
Image

Engine Bay
Image

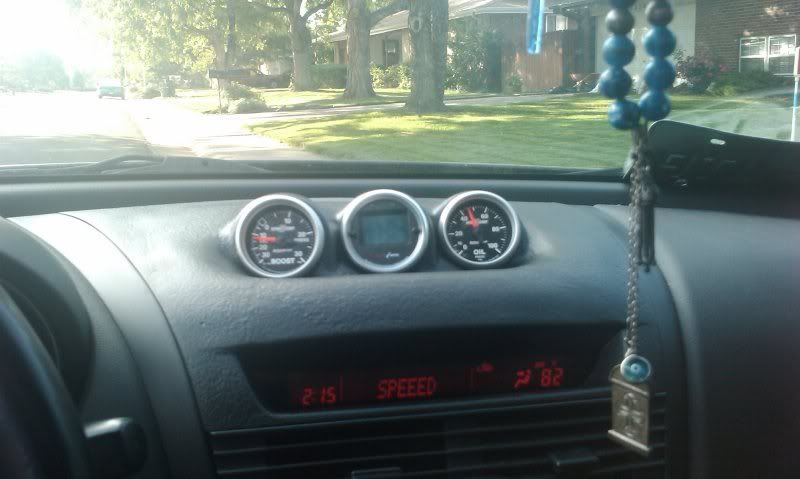
Custom Fiberglassed Lotek gauge pod. I did this back in March/April
Image
Image

And the final product outside
Image
Image
Image
Image
Image

ImageImage

bellalyssa
Posts: 1237
Joined: Wed Jul 15, 2009 9:14
Location: NoCo

Postby bellalyssa » Mon Jun 28, 2010 9:14

Seeeeeexxxxy!!!
2004 Mazda3s Hatchback: Totalled
2002 Audi A4 Avant: Sold

2013 Subaru WRX 5-door: Stage 1

User avatar
MSP SuperStreet
Senior Member
Posts: 603
Joined: Sun Apr 27, 2008 9:14
Location: Glenwood Springs
Contact:

Postby MSP SuperStreet » Mon Jun 28, 2010 9:14

Congrats.
Can't wait to check it out.
Props on the creative problem solving and fabrication.
Time to terrorize the streets. ZOOM ZOOM

User avatar
speedjunkie
Senior Member
Posts: 5369
Joined: Wed Jan 02, 2008 9:14
Location: Colorado Springs
Contact:

Postby speedjunkie » Mon Jun 28, 2010 9:14

Welcome to the boost club lol.
Image

User avatar
iani1.1
Posts: 1942
Joined: Sun Oct 19, 2008 9:14
Location: ATX
Contact:

Postby iani1.1 » Tue Jun 29, 2010 9:14

nice. not a big fan of that wheel gap but you live in denver so i understand lol
Image

User avatar
RX-7 Chris
Posts: 7800
Joined: Tue Oct 02, 2007 9:14
Location: Colorado Springs
Contact:

Postby RX-7 Chris » Tue Jun 29, 2010 9:14

cool, you finally did it.
1984 RX-7 GSL-SE [size=84]My restomod project[/SIZE]


1964 Ford Galaxie 500XL flat black w/ white interior, 2 dr fastback, 390 thunderbird, C6 auto, 2500 rpm high stall converter, shift kit, AC, Holley 750 cfm

[size=100]RIP 1983 RX-7[/SIZE]

My Car Blog

User avatar
VRx8
Senior Member
Posts: 755
Joined: Sat Jul 04, 2009 9:14
Location: San Antonio, TX

Postby VRx8 » Tue Jun 29, 2010 9:14

Get ready to spend crazy money on gas lol!

User avatar
kingtut
Posts: 2729
Joined: Mon Jul 07, 2008 9:14
Location: a secret place
Contact:

Postby kingtut » Tue Jun 29, 2010 9:14

Awesome job- congrats!
one and one makes two, together we are free
Image

User avatar
Huzer
Posts: 4607
Joined: Wed Sep 19, 2007 9:14

Postby Huzer » Tue Jun 29, 2010 9:14

Congrats! I was wondering when you'd be getting this finished. Must be awesome!

User avatar
Colombia28
Posts: 4216
Joined: Wed Sep 19, 2007 9:14
Location: Lone Tree
Contact:

Postby Colombia28 » Tue Jun 29, 2010 9:14

SWEEEEEEEEEEeeeeEEEET!! Can't wait to see numbers!
Image
2008 Cosmic Blue Speed3 - NEW :D
2006 Copper Red Mica 3 hatch - SOLD :(
ΜΟΛΩΝ ΛΑΒΕ

User avatar
tsx_guy
Senior Member
Posts: 7438
Joined: Wed Sep 19, 2007 9:14
Contact:

Postby tsx_guy » Tue Jun 29, 2010 9:14

VRx8 wrote:Get ready to spend crazy money on gas lol!


isn't that part of the rotary charm anyways? :rolleyes:

congrats jimmy!!!
"20<cut off="">"</cut>

TheNewBlack
Posts: 1330
Joined: Fri Sep 21, 2007 9:14
Location: Denver
Contact:

Postby TheNewBlack » Tue Jun 29, 2010 9:14

Looks great!
2013 FRS

User avatar
GR-8
Posts: 5335
Joined: Thu Oct 11, 2007 9:14
Location: Denver/ Lakewood
Contact:

Postby GR-8 » Tue Jun 29, 2010 9:14

bellalyssa wrote:Seeeeeexxxxy!!!


MSP SuperStreet wrote:Congrats.
Can't wait to check it out.
Props on the creative problem solving and fabrication.
Time to terrorize the streets. ZOOM ZOOM


kingtut wrote:Awesome job- congrats!


speedjunkie wrote:Welcome to the boost club lol.

Thanks y'all.
iani1.1 wrote:nice. not a big fan of that wheel gap but you live in denver so i understand lol

What wheel gap? ;) If it was any lower I would never be able to drive it. I't barley made it onto the drive way and onto the lift.
RX-7 Chris wrote:cool, you finally did it.

About time huh?
VRx8 wrote:Get ready to spend crazy money on gas lol!

I'm ready. I think.:huh:

Huzer wrote:Congrats! I was wondering when you'd be getting this finished. Must be awesome!

Took long enough right. I had to take my time getting all the little parts for it. Thanks for the deal on the AP. ;)
Colombia28 wrote:SWEEEEEEEEEEeeeeEEEET!! Can't wait to see numbers!

I can't either. Hopefully I can post them on the 10th.
6i_guy wrote:isn't that part of the rotary charm anyways? :rolleyes:

congrats jimmy!!!

Wow giudo said something nice. :p
Image


ImageImage

User avatar
RX-7 Chris
Posts: 7800
Joined: Tue Oct 02, 2007 9:14
Location: Colorado Springs
Contact:

Postby RX-7 Chris » Tue Jun 29, 2010 9:14

when are you getting it tuned?
1984 RX-7 GSL-SE [size=84]My restomod project[/SIZE]


1964 Ford Galaxie 500XL flat black w/ white interior, 2 dr fastback, 390 thunderbird, C6 auto, 2500 rpm high stall converter, shift kit, AC, Holley 750 cfm

[size=100]RIP 1983 RX-7[/SIZE]

My Car Blog

User avatar
GR-8
Posts: 5335
Joined: Thu Oct 11, 2007 9:14
Location: Denver/ Lakewood
Contact:

Postby GR-8 » Tue Jun 29, 2010 9:14

RX-7 Chris wrote:when are you getting it tuned?

Hopefully on the 10th.
Image


ImageImage


Return to “Rotary Vehicle”

Who is online

Users browsing this forum: No registered users and 76 guests