Build thread
-
speedjunkie

- Senior Member
- Posts: 5289
- Joined: Wed Jan 02, 2008 9:14
- Location: Colorado Springs
- Contact:
Re: Build thread
I installed the reverse camera from Joying and pulled out all the extra wiring from the old cameras. There was a meet last weekend so I put the car on the ground. Now it won't start lol. It sounds really strange, like it's struggling. Or like it's not pulsing at all, just smooth. So it's possible if not likely that I'll be pulling the engine for a rebuild soon. Although I'd still like to send it off to RF85 for the treatment so I can see if it will really work for longevity.
-
speedjunkie
- Senior Member
- Posts: 5289
- Joined: Wed Jan 02, 2008 9:14
- Location: Colorado Springs
- Contact:
Re: Build thread
I picked up some Quicksilver Power Tune from a marine supply store to spray into the engine to try to break up carbon, if indeed the seals are stuck. I pulled the trailing plugs tonight and turned the engine over, and it certainly doesn't sound good haha. It certainly sounds like at least one or two seals are stuck. I want to check to make sure I'm getting spark too but I'll need another person for that. There is fuel on the plugs so I know I'm getting fuel. I sprayed the Power Tune down the LIM ports and turned the engine over after each spray, then once one whole rotation was done for each rotor I sprayed it in while I was turning the engine over. I'll turn it over again tomorrow and spray more if I need to. Hopefully it'll pop some seals loose.
-
speedjunkie
- Senior Member
- Posts: 5289
- Joined: Wed Jan 02, 2008 9:14
- Location: Colorado Springs
- Contact:
Re: Build thread
I turned the engine over a couple times yesterday to let the Power Tune soak in, and it seems like it helped because I turned it over with the key and it's definitely getting better puffs on each face, and they're all consistent. So I'm excited to try to fire it up again.
Jewel was helping me check for spark this afternoon and I found that my rear leading coil isn't firing. I checked the spark plug wire and it's good, still 24 ohms of resistance. I'm going to swap connectors from another coil and verify that the coil is bad, but if it isn't I'll send my map to Joe to check out.
And now my driver's headlight cover has a chunk missing at the rear because I was showing Jewel how bright they are and I didn't think to move a tool out of the way first lol. I have new covers but I was waiting to do all the body work first before installing, so I guess these will get the JB Weld treatment, or maybe the heated staples if the plastic is thick enough.
-
speedjunkie
- Senior Member
- Posts: 5289
- Joined: Wed Jan 02, 2008 9:14
- Location: Colorado Springs
- Contact:
Re: Build thread
I verified tonight that the coil is bad and ordered one from Summit. I was just reading today on 7club that there are fake coils to watch out for, but the ones from AEM should be good, as long as they're legit AEM.
I had an issue removing the coils, one of the bolts seized in the coupler, and it's somewhat of a pain getting it apart, so I think I'll take this opportunity to change that setup a bit.
I had an issue removing the coils, one of the bolts seized in the coupler, and it's somewhat of a pain getting it apart, so I think I'll take this opportunity to change that setup a bit.
-
speedjunkie
- Senior Member
- Posts: 5289
- Joined: Wed Jan 02, 2008 9:14
- Location: Colorado Springs
- Contact:
Re: Build thread
Friday night I spent pretty much the whole night building a new coil mount, only to realize on Saturday that it didn't really look better than the original one and that one already fit fine the way it was, so I just modified that one a bit, cutting off extra material it didn't need and to allow the coils to slide on. I also changed from the rubber dampers to hard spacers since the dampers weren't really damping much anyway, and instead of one long bolt installing both coils on each side at once, I changed to installing each coil individually, using a long threaded rod that goes through the first coil on each side, then installing the outer coils by themselves with their own bolts. My goal was to make it easier to install and remove. It is now more difficult LOL.
I tested the spark on all the coils and it was fantastic, and I know this because I mistakenly moved the spark plug away from the chassis too early once and took all that spark through my body haha. The car started after cranking for a while (I assume due to the Power Tune in the chambers), and it smoked like crazy, also due to the Power Tune. However, while most of the smoke went away, quite a bit remained throughout the few minutes it ran. And it's white smoke. Uh oh. I'm guessing the Power Tune ate through the coolant seals. I noticed the filler cap wasn't that hot after running it up to ~120F and coolant sprayed out. Plus the level wasn't very low yesterday morning and even higher yesterday afternoon since it was warm yesterday. But I did notice last night that my overflow tank was a bit lower than it's been, so I'm thinking it really was burning coolant and pulling from the overflow, and maybe that's why the cap wasn't as hot either.
Just to be sure, I did a pressure test on the coolant system. It didn't hold solid, but it also didn't drop very quickly. Over the 30 minutes, it dropped only a few PSI. I decided to do the champagne test with the Lisle funnel, but the car wouldn't start again. I pulled a plug out later last night and it was covered in carbon and some fluid but I couldn't tell if it was fuel or coolant, probably both. Maybe I'll pull the leading plugs and turn it over to see if coolant is coming out.
But it's looking like this engine is toast. I've never had a failed engine due to coolant seals, and I believe this one would have lasted many more years on those seals. I used the Pineapple HD water seals in this engine and I have them for the next engine too. I'm still trying to decide if I want to get this new engine RF85 treated.
-
speedjunkie
- Senior Member
- Posts: 5289
- Joined: Wed Jan 02, 2008 9:14
- Location: Colorado Springs
- Contact:
Re: Build thread
The other night I pulled all the plugs and turned the engine over but I couldn't see any coolant coming out. I cleaned the plugs and burned them with a torch to make sure all the carbon was burned off. I tried starting again with no luck.
Then last night I put some MMO in the housings and turned the engine over by hand, added some more MMO and started the car. It fired and I ran it for a while, and there were no bubbles outside of a couple tiny bubbles and one big bubble at one point, but nothing that would indicate bad coolant seals. While the car was running I injected some sea foam through the throttle plates and at one point it killed the car, but it fired right up again. Ok, that's a good sign. After that, I injected more sea foam and power tune occasionally and it would smoke more, for obvious reasons. The smoke never fully went away, but it was a lot less than the other day. It was almost not noticeable. Then at one point the radiator fans and the oil cooler fans kicked on at the same time and killed the car and it wouldn't start again. So I'm still confused haha. I believe I put enough cleaner through to clean out a good amount of carbon, but the seals are either still stuck or they're just worn down too much. And I would say the coolant seals are probably decent but not completely healthy. So I'm thinking it's time for a rebuild anyway.
Then last night I put some MMO in the housings and turned the engine over by hand, added some more MMO and started the car. It fired and I ran it for a while, and there were no bubbles outside of a couple tiny bubbles and one big bubble at one point, but nothing that would indicate bad coolant seals. While the car was running I injected some sea foam through the throttle plates and at one point it killed the car, but it fired right up again. Ok, that's a good sign. After that, I injected more sea foam and power tune occasionally and it would smoke more, for obvious reasons. The smoke never fully went away, but it was a lot less than the other day. It was almost not noticeable. Then at one point the radiator fans and the oil cooler fans kicked on at the same time and killed the car and it wouldn't start again. So I'm still confused haha. I believe I put enough cleaner through to clean out a good amount of carbon, but the seals are either still stuck or they're just worn down too much. And I would say the coolant seals are probably decent but not completely healthy. So I'm thinking it's time for a rebuild anyway.
-
speedjunkie
- Senior Member
- Posts: 5289
- Joined: Wed Jan 02, 2008 9:14
- Location: Colorado Springs
- Contact:
Re: Build thread
I took the car out last night to see if I could get the smoke to clear up and break some more carbon loose with high RPM. The smoke did go away eventually, but the check engine light kept going on and off sporadically. It was a code for something related to the trigger/timing and both EGT sensors reading maximum. Steve suggested that the timing looked retarded, so I reached out to Joe and he remoted into the laptop and we checked timing, it was indeed retarded 15 degrees. Once Joe reset it to zero, it started much easier. I checked today starting cold and it was much easier as well. The EGT sensor codes pop up every time I start the car still though. Starting still isn't perfect, but at least it's starting and it's not too bad.
-
speedjunkie
- Senior Member
- Posts: 5289
- Joined: Wed Jan 02, 2008 9:14
- Location: Colorado Springs
- Contact:
Re: Build thread
Xavier and I messed with timing more on Monday after I realized I was misusing the timing light and therefore giving incorrect information for timing. We got it changed back to the correct settings, but the car has been more difficult to start again. I've tried adjusting cranking fuel, cranking timing, nothing seems to work. I may have found a way to start it easier by mashing the gas pedal for a moment when I first turn the key, but I don't want to find a way to start it, I want it to start the way it's supposed to.
The EGT sensors have been throwing codes every time I start the car, and throughout a drive, but the OBDII dongle wasn't connecting to my stereo so I didn't see what the actual readings were. Once I got it hooked up again, you could definitely see they're messed up. Also, the Torque app lost all my saved gauges but kept the theme I was using, weird. So I had to re-add all the gauges. On top of that, it rarely stays connected to the dongle, and usually won't reconnect after it's lost connection. Tonight it stayed connected all the way home from Xavier's house, I was surprised. I wish I could find a wired option so it connected automatically.
I also noticed the car was more sluggish, and discovered it's due to the EGT sensors being bad. They have parameters set up to increase fuel by 5% and limit boost to spring pressure. We disabled the safety and the code still comes up but it looks like boost is back to normal.
-
speedjunkie
- Senior Member
- Posts: 5289
- Joined: Wed Jan 02, 2008 9:14
- Location: Colorado Springs
- Contact:
Re: Build thread
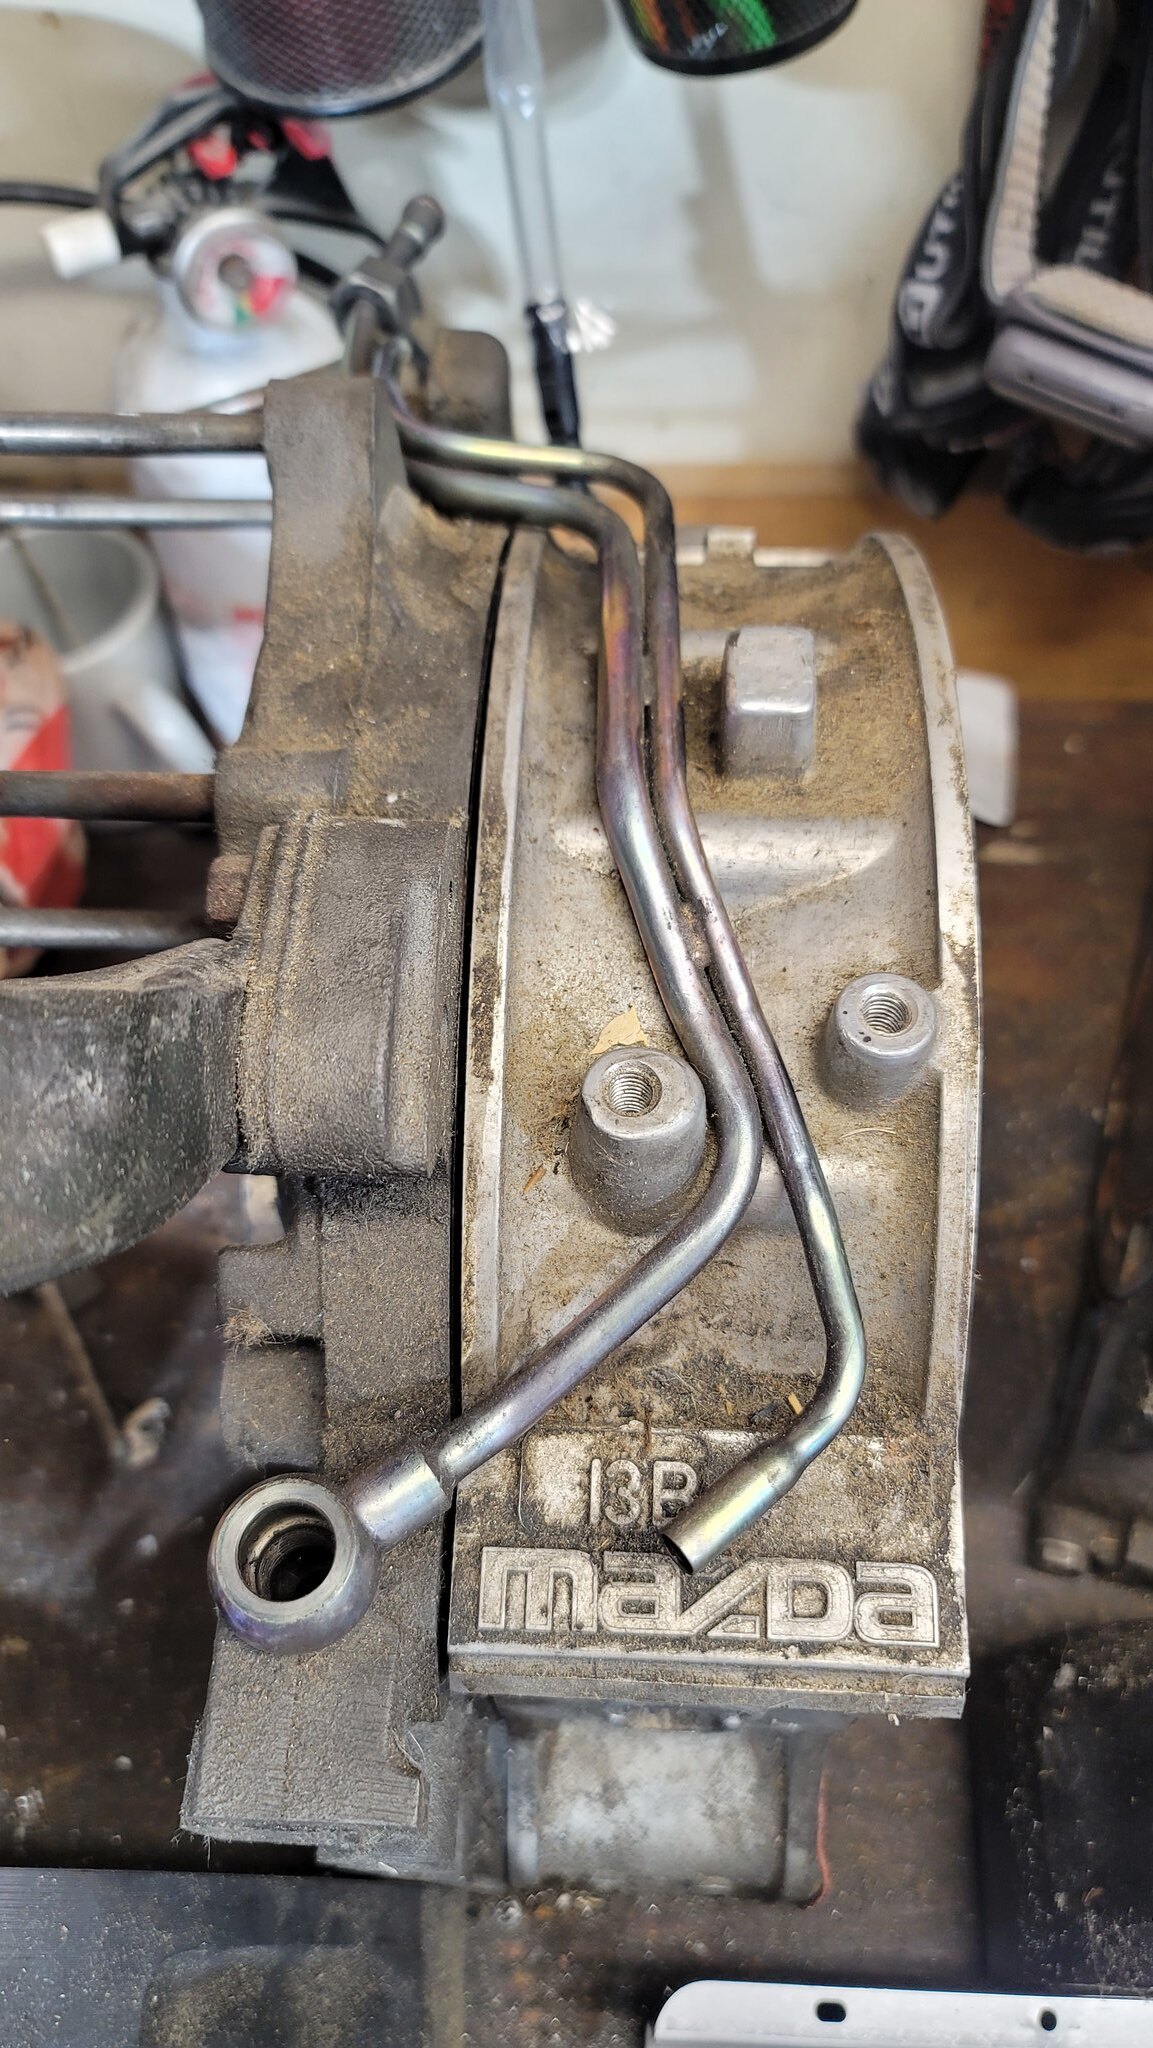
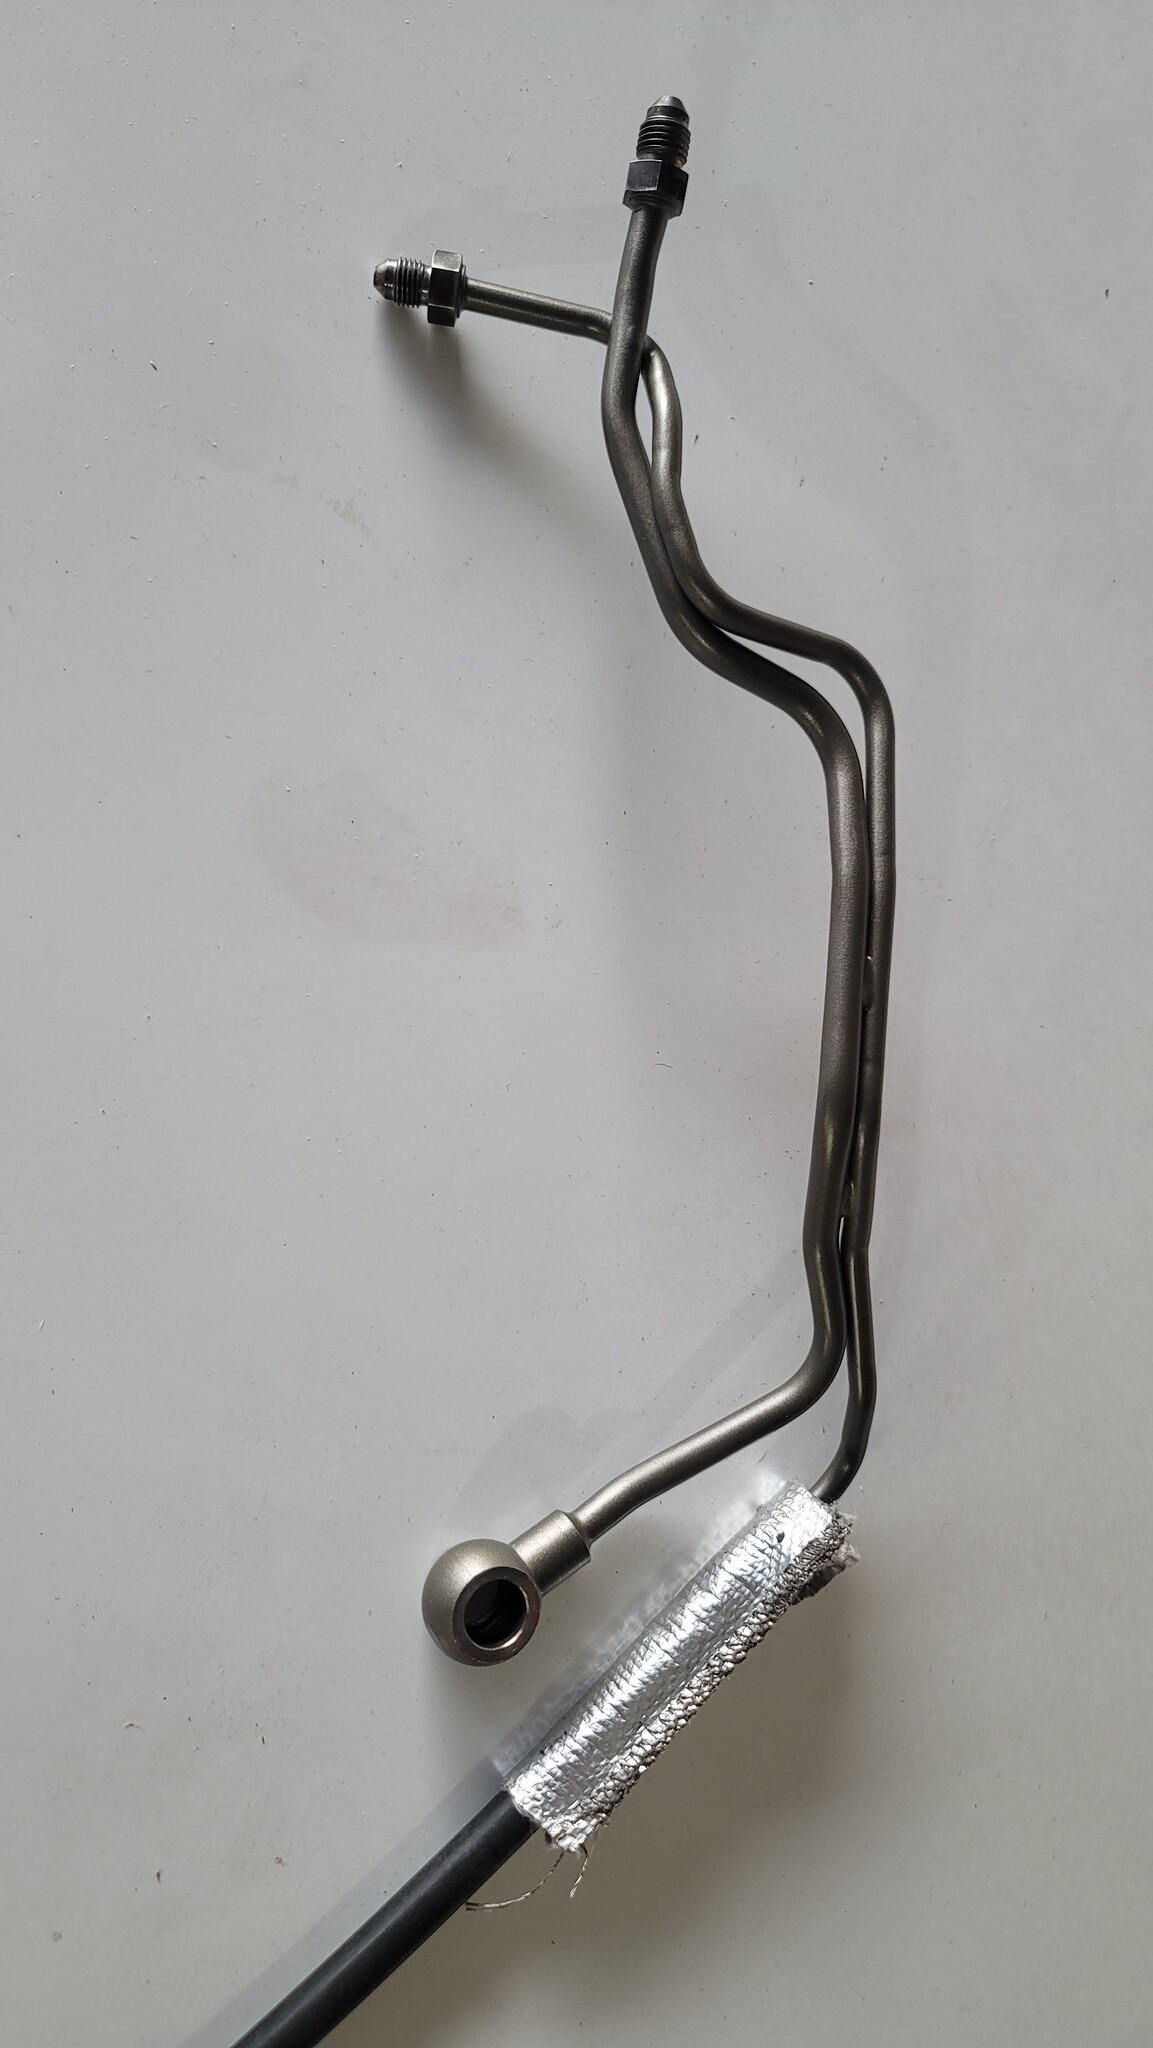
I had an epiphany a few days ago. I thought of using the stock turbo oil feed line about a year ago but I thought it would interfere with my heat shield on top of the engine. I have the spare engine block on the work bench so I decided to test fit the line. It sits snug to the engine and will route under the heat shield. It'll heat up the oil a bit more, but the water is there to cool the turbo, and the oil shouldn't be that much hotter. And it's a hard line so I don't have to worry about it getting damaged and leaking, or wearing out over time. I might have to modify the heat shield a little, but not enough to avoid doing this. I get so excited over stuff like this, refining it with little improvements, making it cleaner. It's the small details.
 20240302_171536 by Eric Jausel, on Flickr
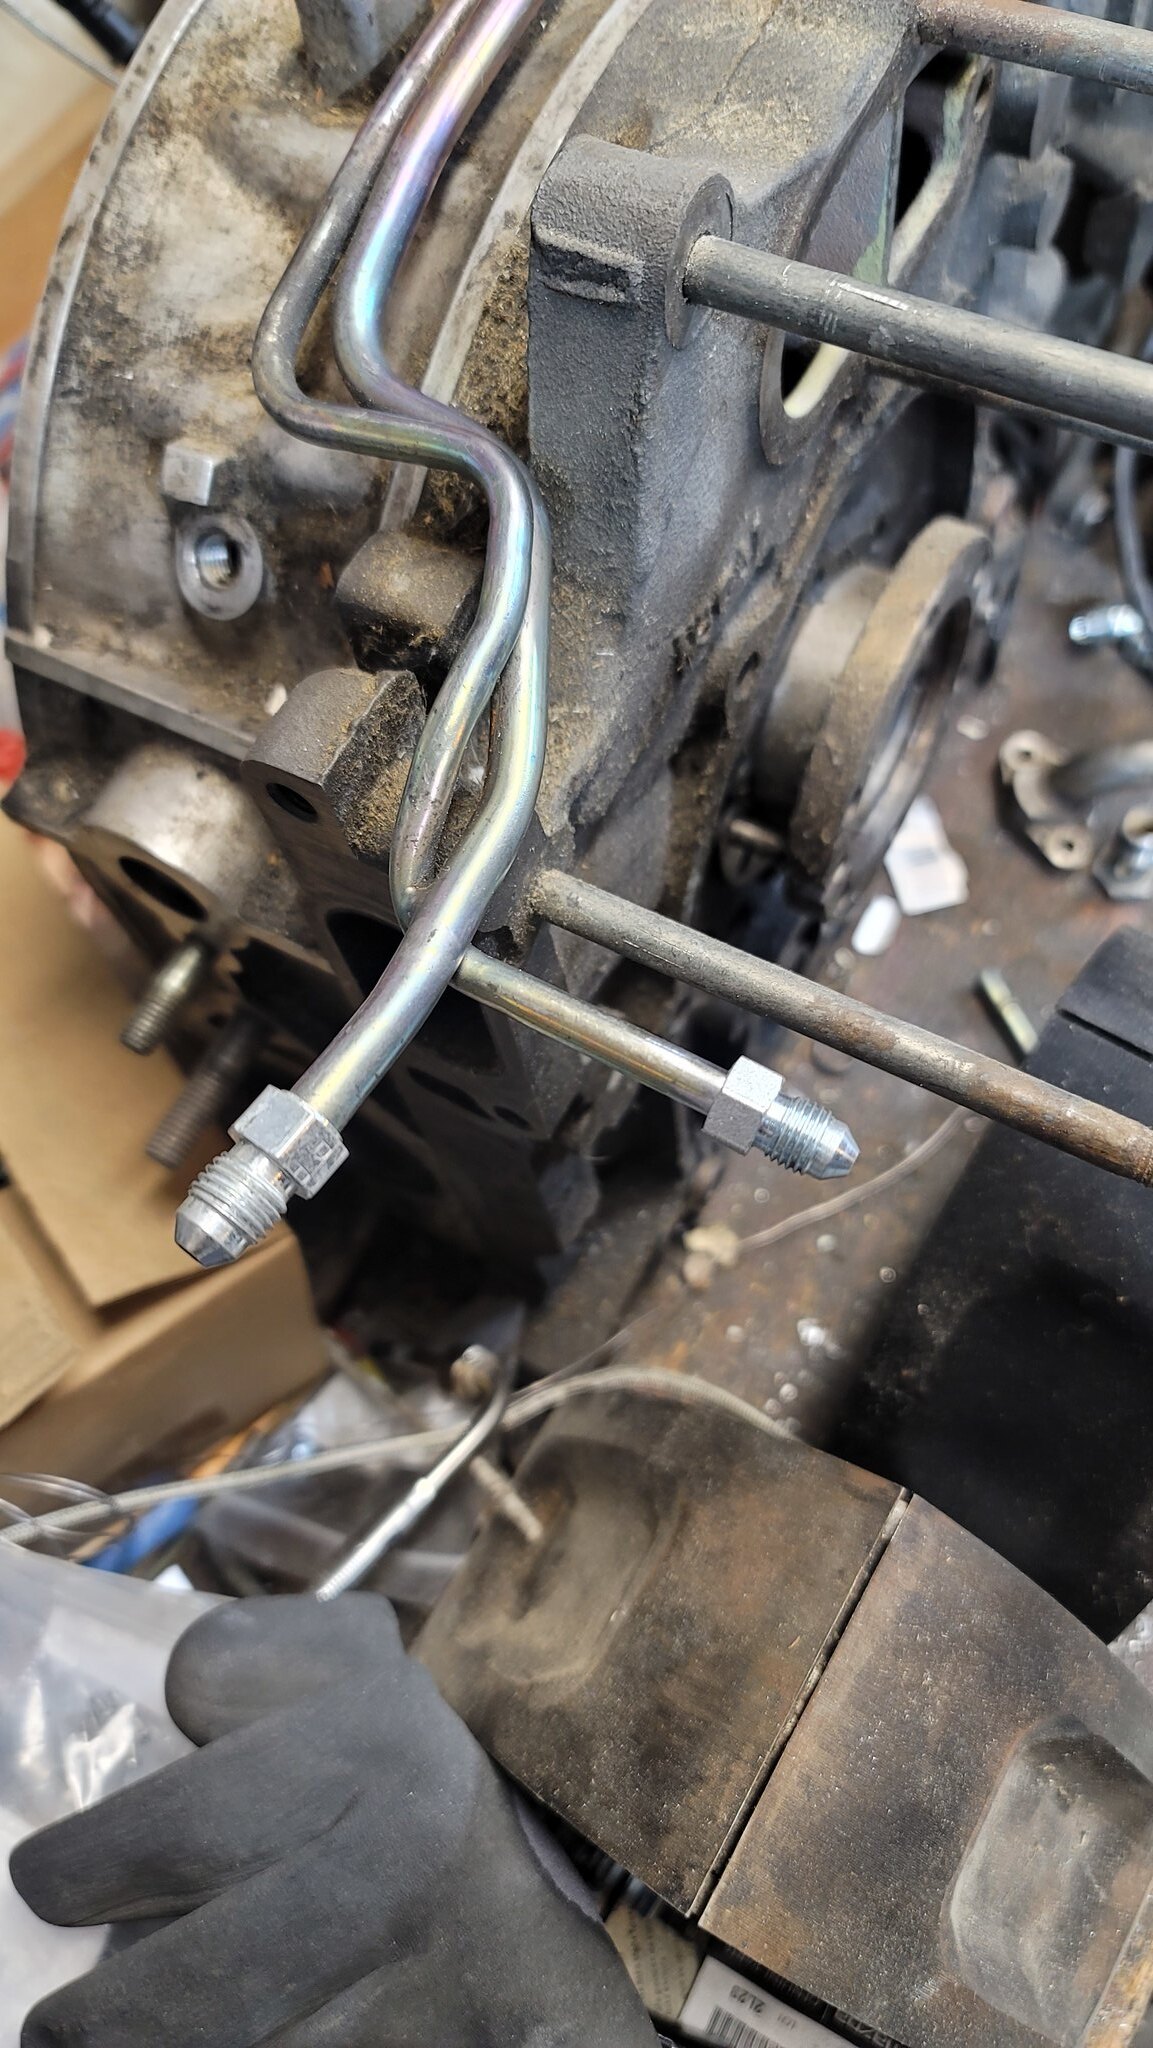
I was planning on cutting the lines apart to use the oil line, then I started thinking about what I could use the vacuum line for and realized I've been looking for a cleaner solution for the vacuum line to the turbo. WHAT?! This is perfect! Last winter I had bought 3AN fittings to use for the vacuum line and I had a 4AN fitting left over for the oil line. Initially I was considering using stock oil fitting too and cutting that end off the turbo side to add to a hard line that I'll use to finish to the turbo, but if I change that to a 4AN I can still use a hard line or use a braided line if I need more flexibility. I cut off the other threaded end of the fittings and drilled them out.
 20240305_203450 by Eric Jausel, on Flickr
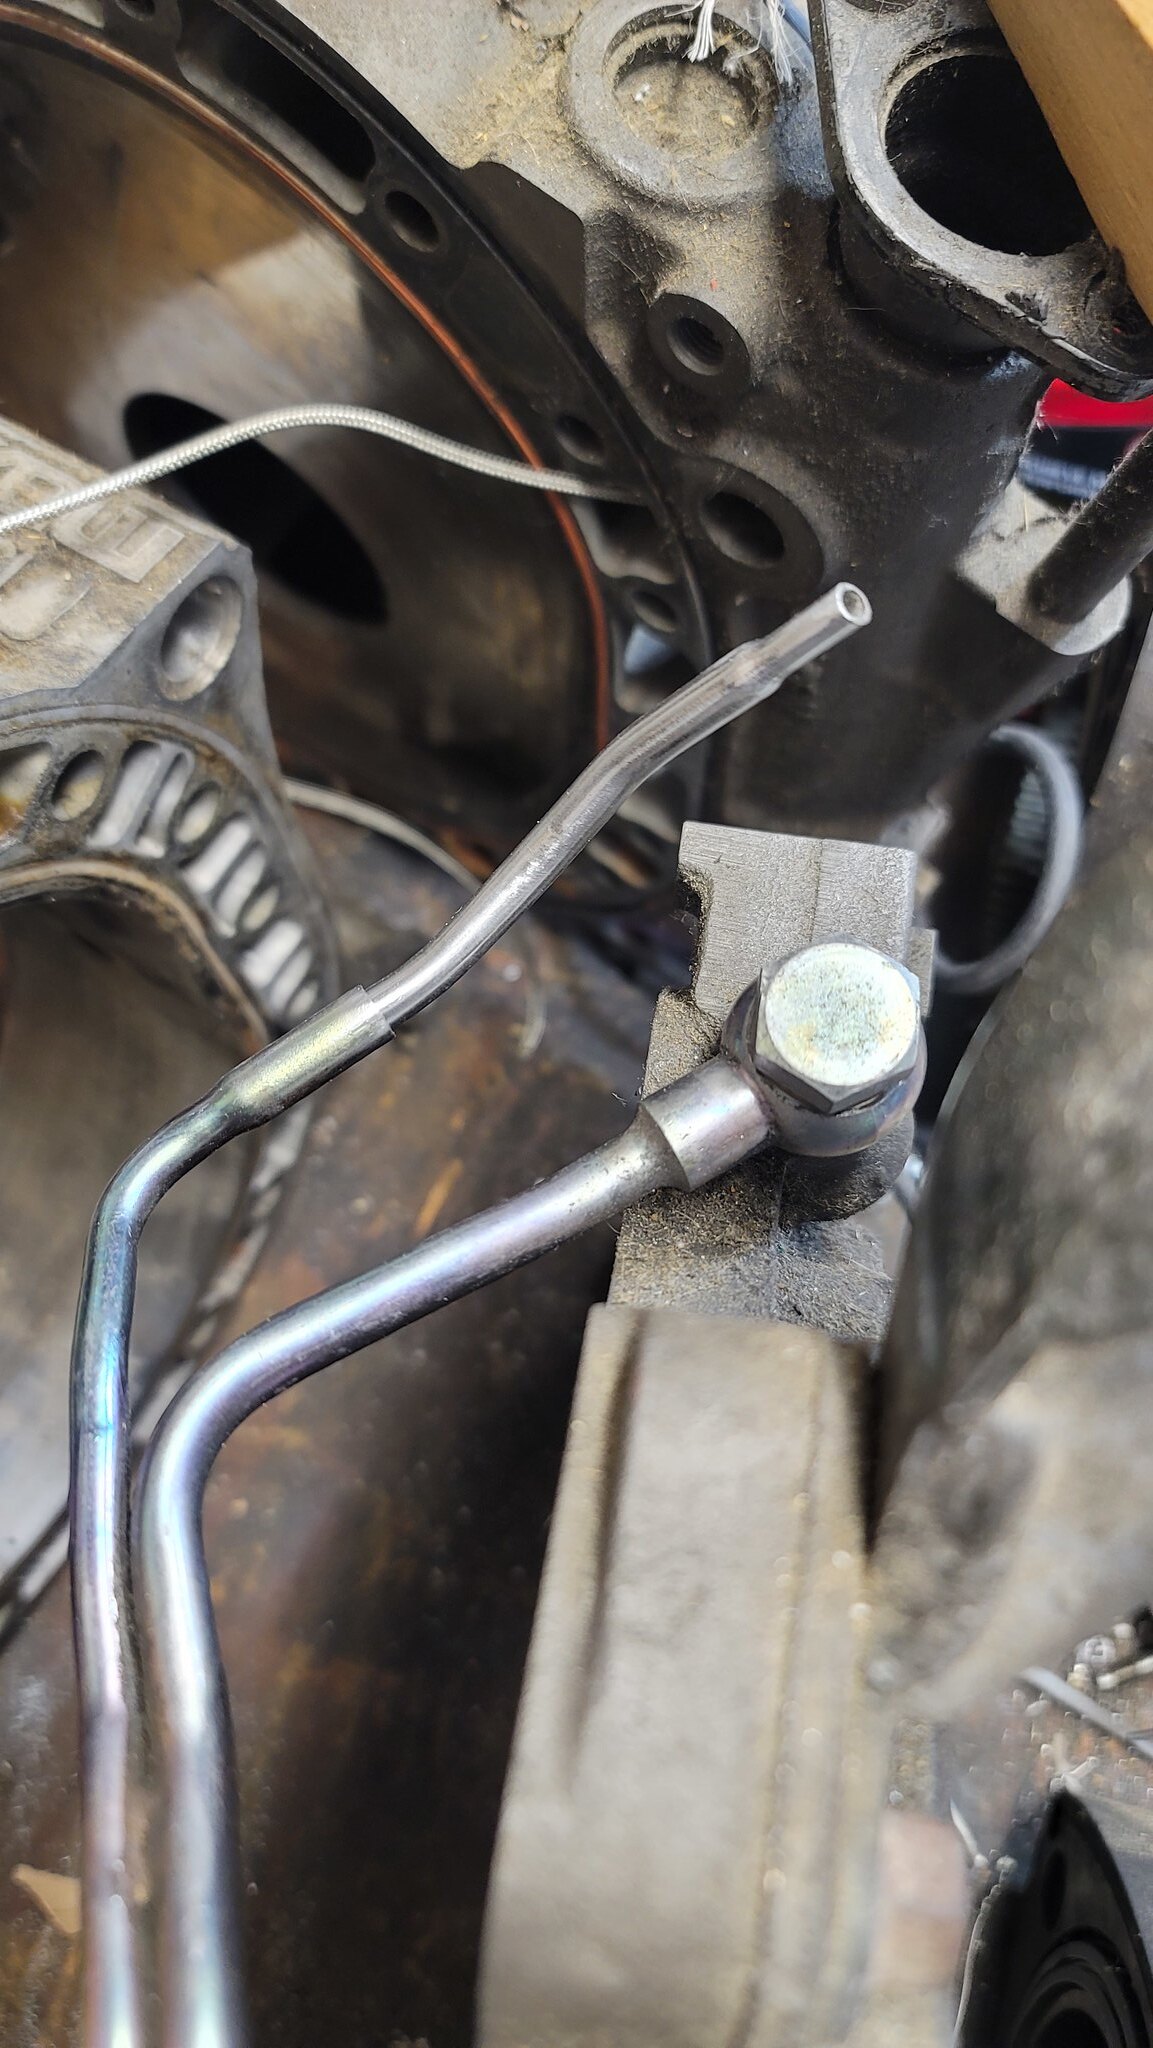
This is the stock oil fitting setup that I decided against.
 20240303_163212 by Eric Jausel, on Flickr
The other end of the vacuum line is kinda fat so I'd have to use a larger line, then a step down for a smaller line to attach to the UIM, or cut off a smaller line to fit into the fat end and have it point where I need it to in order to make it easier to pull off and put back on when removing and installing the UIM, so I chose the latter. I'm not completely happy with that end I'm adding, but it can be bent to where I like it. I haven't test fit any of this on the engine yet but any changes that need to be made should be small enough that I can bend the lines to make them work.
 20240304_203151 by Eric Jausel, on Flickr
In addition to all this, I'm going to try to use the stock oil drain line for the turbo as well. I measured the bolt spacing and it matches up, but I'll have to drill the holes out a bit to go from stock M6 size to M8 on the EFR. It even has a little heat shield for the line right at the turbo. I think it will work but I'll have to modify the line going from that to the engine. I'll do that next time the turbo and/or engine is/are out of the car, along with making the coolant hard lines for the turbo.
I changed cranking timing tonight to see if it would start easier, no luck. So maybe I'm still pulling this engine out sooner than I thought haha. I'm kinda thinking about it anyway just so I can do all this. I still need the oil pan from Pineapple too, and to get the new block ready to build.
20240302_171536 by Eric Jausel, on FlickrI was planning on cutting the lines apart to use the oil line, then I started thinking about what I could use the vacuum line for and realized I've been looking for a cleaner solution for the vacuum line to the turbo. WHAT?! This is perfect! Last winter I had bought 3AN fittings to use for the vacuum line and I had a 4AN fitting left over for the oil line. Initially I was considering using stock oil fitting too and cutting that end off the turbo side to add to a hard line that I'll use to finish to the turbo, but if I change that to a 4AN I can still use a hard line or use a braided line if I need more flexibility. I cut off the other threaded end of the fittings and drilled them out.
20240305_203450 by Eric Jausel, on Flickr This is the stock oil fitting setup that I decided against.
20240303_163212 by Eric Jausel, on FlickrThe other end of the vacuum line is kinda fat so I'd have to use a larger line, then a step down for a smaller line to attach to the UIM, or cut off a smaller line to fit into the fat end and have it point where I need it to in order to make it easier to pull off and put back on when removing and installing the UIM, so I chose the latter. I'm not completely happy with that end I'm adding, but it can be bent to where I like it. I haven't test fit any of this on the engine yet but any changes that need to be made should be small enough that I can bend the lines to make them work.
20240304_203151 by Eric Jausel, on FlickrIn addition to all this, I'm going to try to use the stock oil drain line for the turbo as well. I measured the bolt spacing and it matches up, but I'll have to drill the holes out a bit to go from stock M6 size to M8 on the EFR. It even has a little heat shield for the line right at the turbo. I think it will work but I'll have to modify the line going from that to the engine. I'll do that next time the turbo and/or engine is/are out of the car, along with making the coolant hard lines for the turbo.
I changed cranking timing tonight to see if it would start easier, no luck. So maybe I'm still pulling this engine out sooner than I thought haha. I'm kinda thinking about it anyway just so I can do all this. I still need the oil pan from Pineapple too, and to get the new block ready to build.
-
speedjunkie
- Senior Member
- Posts: 5289
- Joined: Wed Jan 02, 2008 9:14
- Location: Colorado Springs
- Contact:
Re: Build thread
Xavier welded the fittings on for me, the one for vacuum was closed almost completely haha, so I drilled it out through the end of the fitting. He tacked the vacuum extension on, but I might just cut it off. I test fit a different line with just the stock vacuum end along with a soft line with an adapter in the middle to disconnect, and it seems like it will be just as easy, or easier.
I started modifying another pair of lines to have the fittings brazed on, and I tried to do it myself with a MAP torch and some Harris Safety-silv 56, and it didn't go well lol. I called around today and even the places with websites that say they do brazing don't actually do it anymore. It seems to be a lost art. I'm still trying to decide on what kind of coating or treatment to do on the lines, either electroless nickel plate like so many other things I've had done, and Ximpak does it here in town, or something like yellow chromate or zinc plating, etc.
I had another realization last night, this time about the hard line for the catch can that crosses the engine. The -8 takes up so much room, and I realized that I could just use an 8AN to 6AN adapter and use the -6 line across the engine so it takes up less space, and I can get rid of the adapter at the catch can that just takes up extra space, AND it'll be easier to route around the oil filler neck.
Tonight I swapped the elbow on the bov/recirc valve, and when I was pulling the piping out, I noticed the open hole on the bottom of the pipe between the turbo and IC. It's the extra port I added so I can swap the k type sensor from the intake pipe to that pipe, but I either forgot to plug it, or it fell out. I doubt it fell out, I don't see how it would, so I'm wondering just how messed up my tune is haha.
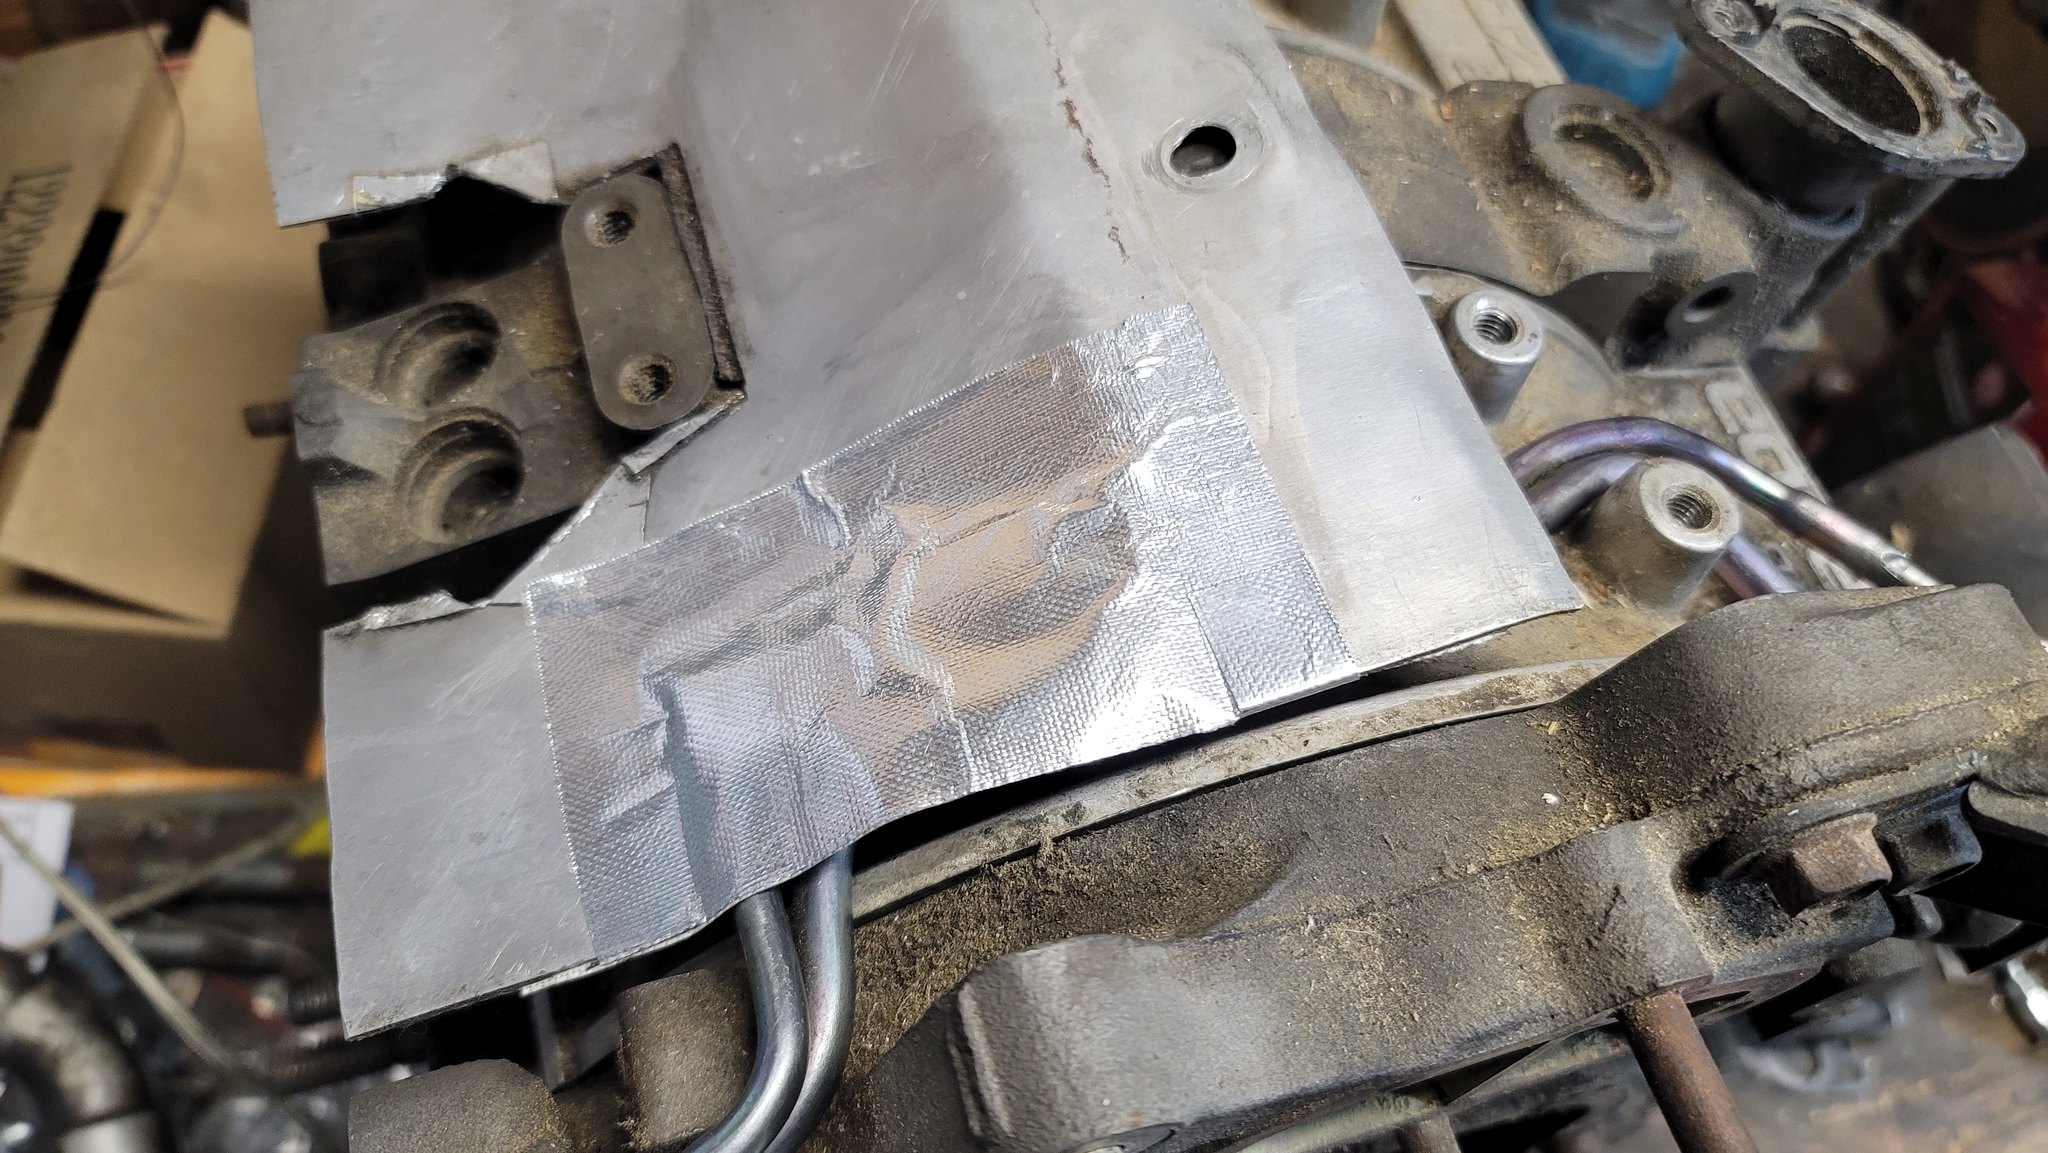
I've also modified the heat shield for the top of the engine because it didn't completely clear the lines. I cut out a chunk and added the adhesive heat wrap to both sides to cover the hole. During this time I also noticed the center iron for the replacement engine doesn't have a threaded hole to mount the heat shield. Soooo that sucks.
 20240307_194056 by Eric Jausel, on Flickr
I started modifying another pair of lines to have the fittings brazed on, and I tried to do it myself with a MAP torch and some Harris Safety-silv 56, and it didn't go well lol. I called around today and even the places with websites that say they do brazing don't actually do it anymore. It seems to be a lost art. I'm still trying to decide on what kind of coating or treatment to do on the lines, either electroless nickel plate like so many other things I've had done, and Ximpak does it here in town, or something like yellow chromate or zinc plating, etc.
I had another realization last night, this time about the hard line for the catch can that crosses the engine. The -8 takes up so much room, and I realized that I could just use an 8AN to 6AN adapter and use the -6 line across the engine so it takes up less space, and I can get rid of the adapter at the catch can that just takes up extra space, AND it'll be easier to route around the oil filler neck.
Tonight I swapped the elbow on the bov/recirc valve, and when I was pulling the piping out, I noticed the open hole on the bottom of the pipe between the turbo and IC. It's the extra port I added so I can swap the k type sensor from the intake pipe to that pipe, but I either forgot to plug it, or it fell out. I doubt it fell out, I don't see how it would, so I'm wondering just how messed up my tune is haha.
I've also modified the heat shield for the top of the engine because it didn't completely clear the lines. I cut out a chunk and added the adhesive heat wrap to both sides to cover the hole. During this time I also noticed the center iron for the replacement engine doesn't have a threaded hole to mount the heat shield. Soooo that sucks.
20240307_194056 by Eric Jausel, on Flickr-
speedjunkie
- Senior Member
- Posts: 5289
- Joined: Wed Jan 02, 2008 9:14
- Location: Colorado Springs
- Contact:
Re: Build thread
Last night I made the new hard line for the catch can. It came out really nice, especially since I buffed it a little with a high count sandpaper and then steel wool afterwards. It came out much nicer than the last line.
 20240313_225112 by Eric Jausel, on Flickr
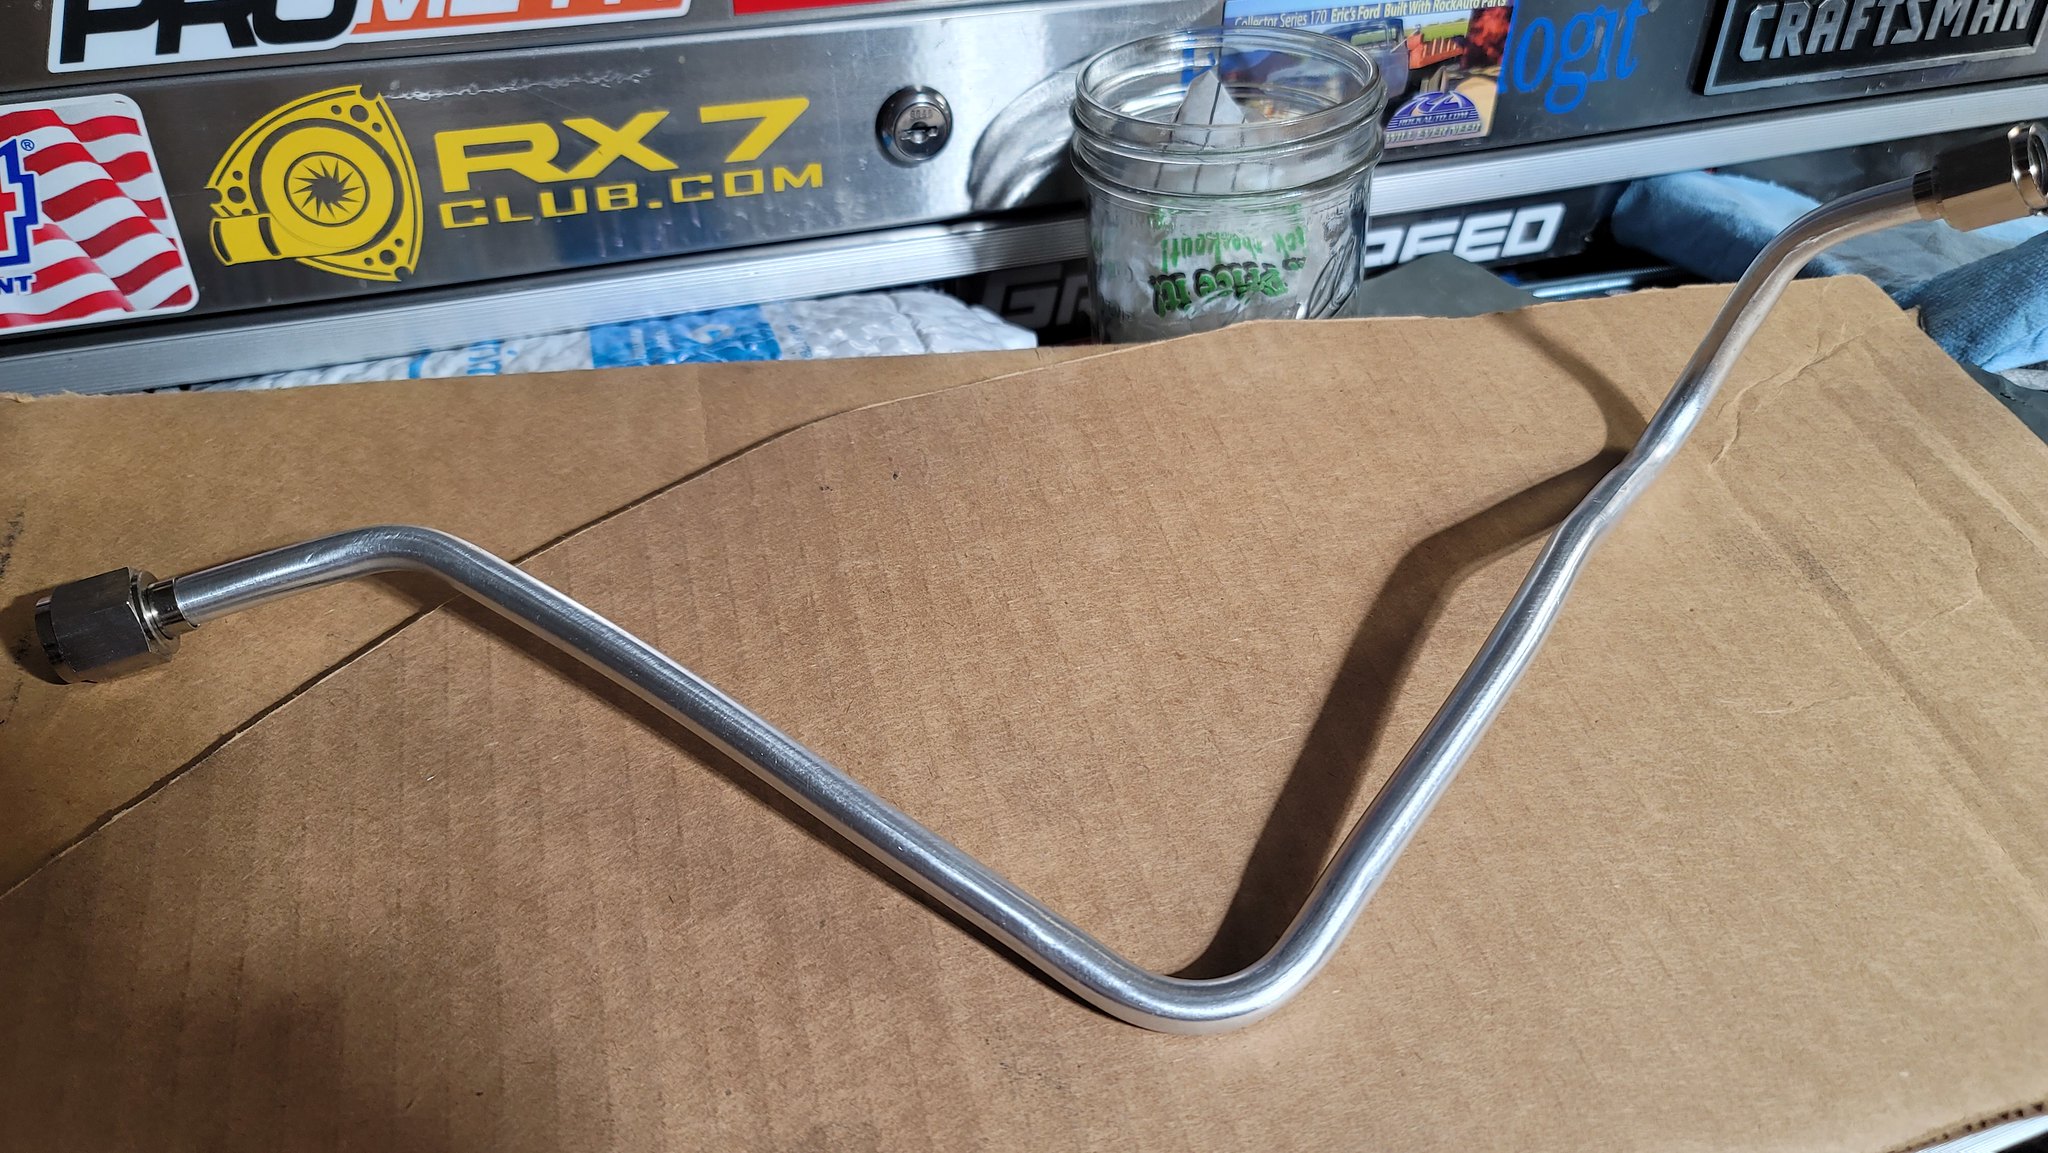 20240313_225841 by Eric Jausel, on Flickr
I also thought about a way to mount the coil bracket to make installation and removal easier, using studs and nuts instead of bolts. I cut a couple pieces of threaded rod and tried it, and it looks like it'll work much better. But then I noticed another way that will make it even easier, by using the bolt holes that are under the two outer most coils. I can remove the top bolt on both coils and angle them down to get access to those holes. I've known that for a while but realized last night I can angle them further than I thought.
I dropped off the second set of lines at Heavy Metal Fabrication yesterday afternoon, he's going to TIG weld the fittings on. I gave up on trying to find someone to braze them lol.
20240313_225112 by Eric Jausel, on Flickr20240313_225841 by Eric Jausel, on FlickrI also thought about a way to mount the coil bracket to make installation and removal easier, using studs and nuts instead of bolts. I cut a couple pieces of threaded rod and tried it, and it looks like it'll work much better. But then I noticed another way that will make it even easier, by using the bolt holes that are under the two outer most coils. I can remove the top bolt on both coils and angle them down to get access to those holes. I've known that for a while but realized last night I can angle them further than I thought.
I dropped off the second set of lines at Heavy Metal Fabrication yesterday afternoon, he's going to TIG weld the fittings on. I gave up on trying to find someone to braze them lol.
-
speedjunkie
- Senior Member
- Posts: 5289
- Joined: Wed Jan 02, 2008 9:14
- Location: Colorado Springs
- Contact:
Re: Build thread
I bought a OBD2 to USB cable and plugged it directly into my head unit. It seems to work so far, hopefully this solves the connection issues.
https://www.amazon.com/OBDLink-EX-FORSc ... 070&sr=8-6
I got the oil feed line back from Heavy Metal on Friday. I'm not 100% happy with this set either. I figured I'd widen my search to the Denver area, and Brad Hopkins would be the best person to ask. Turns out, Brad can braze them haha. So I'm buying another line from someone on 7club and hopefully I'll get it by this weekend so I can take it to Brad. On top of that, I ordered stainless fittings to use this time so I wouldn't have to get it replated or anything.
I took the driver's headlight apart to see why one corner shifts up and down, and the hole is worn out. It's not often that people sell these parts, so I'm on the hunt for just the bucket if possible.
-
speedjunkie
- Senior Member
- Posts: 5289
- Joined: Wed Jan 02, 2008 9:14
- Location: Colorado Springs
- Contact:
Re: Build thread
I added a battery power bypass yesterday, for when the circuit breaker pops and won't reset for a minute and I'm in traffic needing to start the car immediately. I thought maybe it was a bug with the circuit breaker, but after looking up other breakers, it seems like it's a feature, so I decided to go this route instead. I bought this cutoff switch from Harbor Freight YEARS ago and never found a use for it until now. I ordered some 4ga cable and it probably would have been fine, but I had 0ga on hand. It was quite a bit more difficult to get everything to fit. It's getting pretty cramped in there.
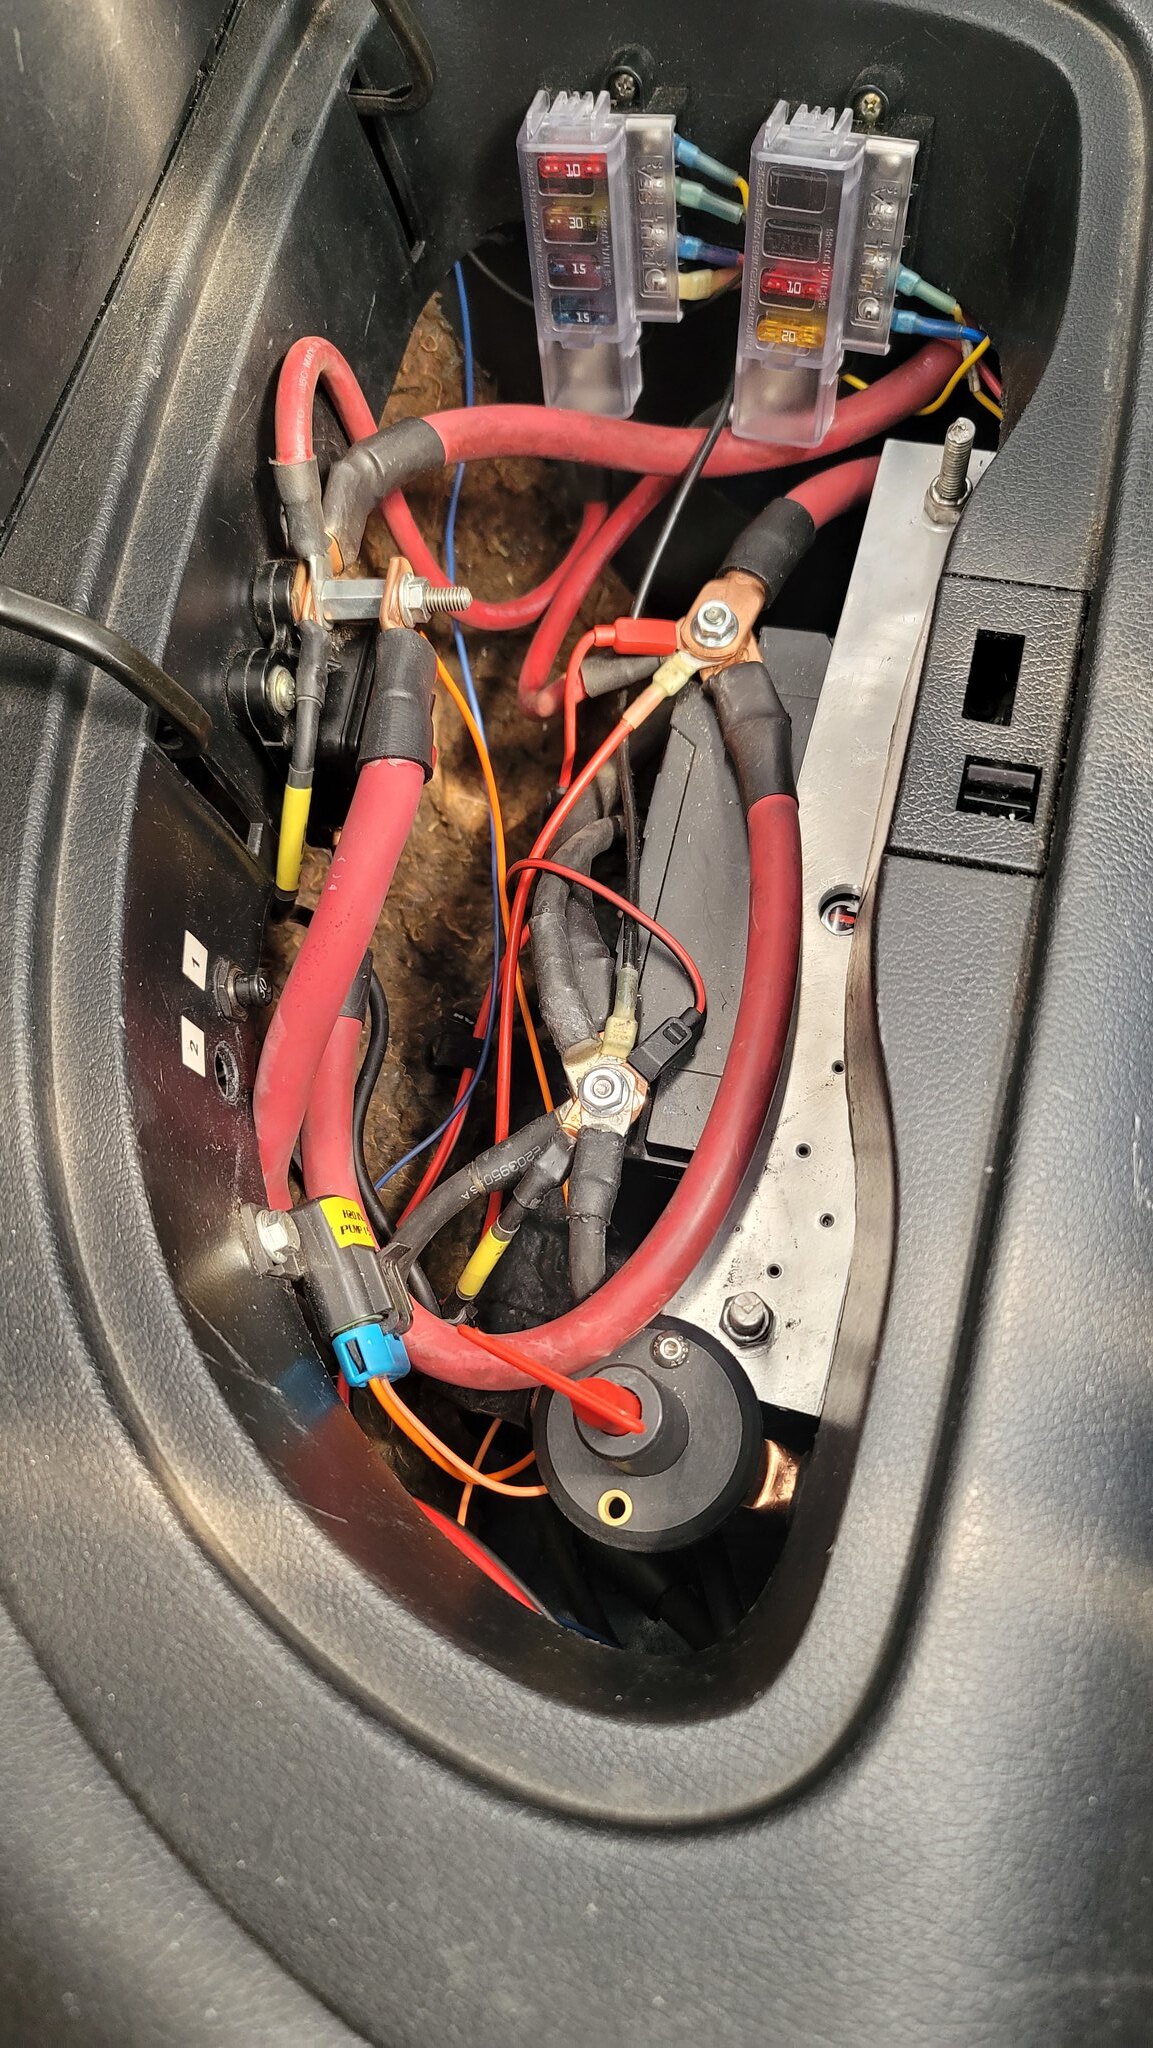 20240320_181141 by Eric Jausel, on Flickr
I completely removed the left headlight bucket tonight in preparation for getting the replacement I bought on 7club yesterday. $135 seems kinda steep for what it is, but these don't really come up for sale very often by themselves. Someone local said he had some for sale, but I never heard back from him. And I super glued the broken piece on the headlight cover a few days ago and put some JB Weld on it last night. There's a huge chunk out of the side of it too, but that's only noticeable when it's up so I'm not as worried about it, and I have the new covers for when I finally do the body work and paint. SBG has also released cast aluminum headlight covers too. They're twice the weight, but definitely more durable.
SBG also released thermostats that mount directly to the coolers, which is very tempting, but I'm not excited at the thought of redoing the lines again haha. They work with the stock lines, and I was actually kinda thinking about reinstalling the stock lines since I'm switching back to so much stock stuff already haha, but the hardline that goes to the filter would be in the way of quite a bit. I might actually make a hard line the goes from there down that side of the frame instead so it will still be out of the way. I've always been nervous about keeping it out of the way of the steering linkage and hoping it doesn't rub on the frame too much. Maybe I'll just secure it to the frame with clamps instead. A hard line would be cleaner though.
I bought another oil feed line from someone on 7club as well, and I cut and drilled the stainless fittings for that tonight. I'm supposed to get the line on Friday, but it says by 9pm so I'll be surprised if it gets here before Saturday. Once I cut that, I'll take that up to Brad on Saturday hopefully and then I can start putting the engine bay back together.
I pulled the IC out tonight to start designing the VMIC ducting, and I was thinking maybe I'll change the setup a little when I do the new IC, and instead of a V, I'll stand the IC up as much as possible. The core would be about the same size; instead of 9"x14" it would be more like 8"x14-16", and the piping would be a tad longer. But it might help cooling better being straight to the airflow. Just a thought a this point.
I noticed something weird with my radiator though. The side is bowing out on the passenger side. Not sure what caused that.
 20240320_195418 by Eric Jausel, on Flickr
20240320_181141 by Eric Jausel, on FlickrI completely removed the left headlight bucket tonight in preparation for getting the replacement I bought on 7club yesterday. $135 seems kinda steep for what it is, but these don't really come up for sale very often by themselves. Someone local said he had some for sale, but I never heard back from him. And I super glued the broken piece on the headlight cover a few days ago and put some JB Weld on it last night. There's a huge chunk out of the side of it too, but that's only noticeable when it's up so I'm not as worried about it, and I have the new covers for when I finally do the body work and paint. SBG has also released cast aluminum headlight covers too. They're twice the weight, but definitely more durable.
SBG also released thermostats that mount directly to the coolers, which is very tempting, but I'm not excited at the thought of redoing the lines again haha. They work with the stock lines, and I was actually kinda thinking about reinstalling the stock lines since I'm switching back to so much stock stuff already haha, but the hardline that goes to the filter would be in the way of quite a bit. I might actually make a hard line the goes from there down that side of the frame instead so it will still be out of the way. I've always been nervous about keeping it out of the way of the steering linkage and hoping it doesn't rub on the frame too much. Maybe I'll just secure it to the frame with clamps instead. A hard line would be cleaner though.
I bought another oil feed line from someone on 7club as well, and I cut and drilled the stainless fittings for that tonight. I'm supposed to get the line on Friday, but it says by 9pm so I'll be surprised if it gets here before Saturday. Once I cut that, I'll take that up to Brad on Saturday hopefully and then I can start putting the engine bay back together.
I pulled the IC out tonight to start designing the VMIC ducting, and I was thinking maybe I'll change the setup a little when I do the new IC, and instead of a V, I'll stand the IC up as much as possible. The core would be about the same size; instead of 9"x14" it would be more like 8"x14-16", and the piping would be a tad longer. But it might help cooling better being straight to the airflow. Just a thought a this point.
I noticed something weird with my radiator though. The side is bowing out on the passenger side. Not sure what caused that.
20240320_195418 by Eric Jausel, on Flickr-
speedjunkie
- Senior Member
- Posts: 5289
- Joined: Wed Jan 02, 2008 9:14
- Location: Colorado Springs
- Contact:
Re: Build thread
I took the line up to Denver today and Brad brazed the stainless fittings on. It looks wonderful, exactly what I was going for. He was saying I wouldn't have to get it plated again, but after using a wire wheel to remove all the flux, it also removed the plating I believe. So now I'm trying to decide if I want to get it replated still or just spray it with clear coat, at least for now. I'm going to pressure test all the lines and maybe get all of them plated again, that way I'll have some backups or maybe sell the extras if anyone is interested.
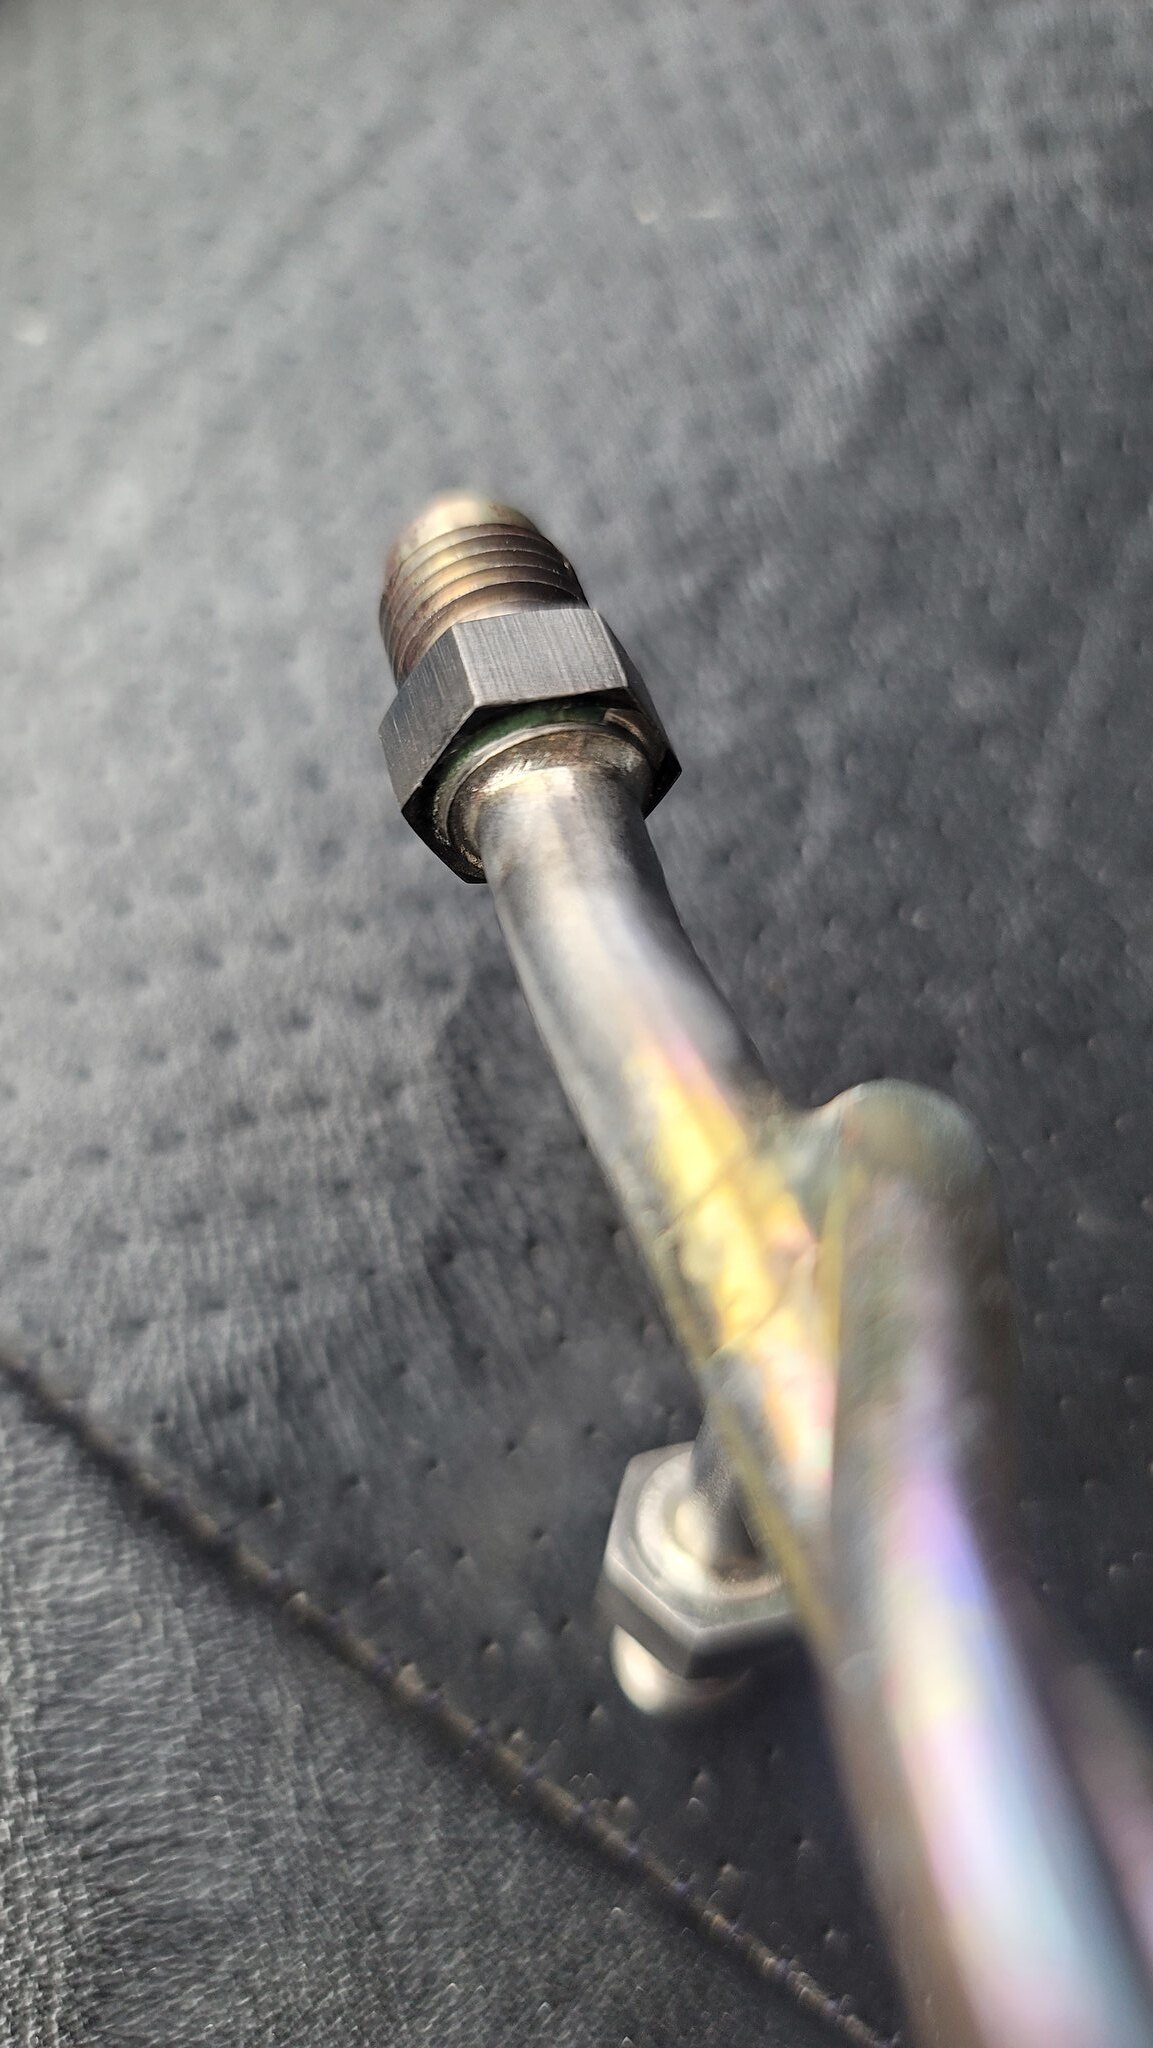 20240323_171006 by Eric Jausel, on Flickr
 20240323_170950 by Eric Jausel, on Flickr
I was swapping the headlight bucket and broke one of the plastic bushings that the adjustment screws go into. I went to O'Reilly and they only had one that came with a screw, but I needed more pieces and decided to just see if I could get them all from Mazda still. They had all but one of the pieces I really need, they said that one is NLA. I bought all the available ones and it came out to $70! I reached out to Ray Crowe yesterday and he didn't say any were unavailable, but we'll see. I'm going to buy extras though, that's for sure.
20240323_171006 by Eric Jausel, on Flickr20240323_170950 by Eric Jausel, on FlickrI was swapping the headlight bucket and broke one of the plastic bushings that the adjustment screws go into. I went to O'Reilly and they only had one that came with a screw, but I needed more pieces and decided to just see if I could get them all from Mazda still. They had all but one of the pieces I really need, they said that one is NLA. I bought all the available ones and it came out to $70! I reached out to Ray Crowe yesterday and he didn't say any were unavailable, but we'll see. I'm going to buy extras though, that's for sure.
-
speedjunkie
- Senior Member
- Posts: 5289
- Joined: Wed Jan 02, 2008 9:14
- Location: Colorado Springs
- Contact:
Re: Build thread
I finally finished the headlight repair, replacing all the adjustment hardware with new. Everything I could get anyway, which was everything but the largest bolt. But it's all solid now. And I repaired the cover a while back, but it still looks like crap on the outside haha.
I also fired up the car a couple times today and it started pretty easily. So maybe it's still good? LOL
I started mocking up art board pieces to figure out what I need to cut for ducting, but I really should have done it before I installed the radiator. I guess I'll have to remove the front bumper to really get to it.
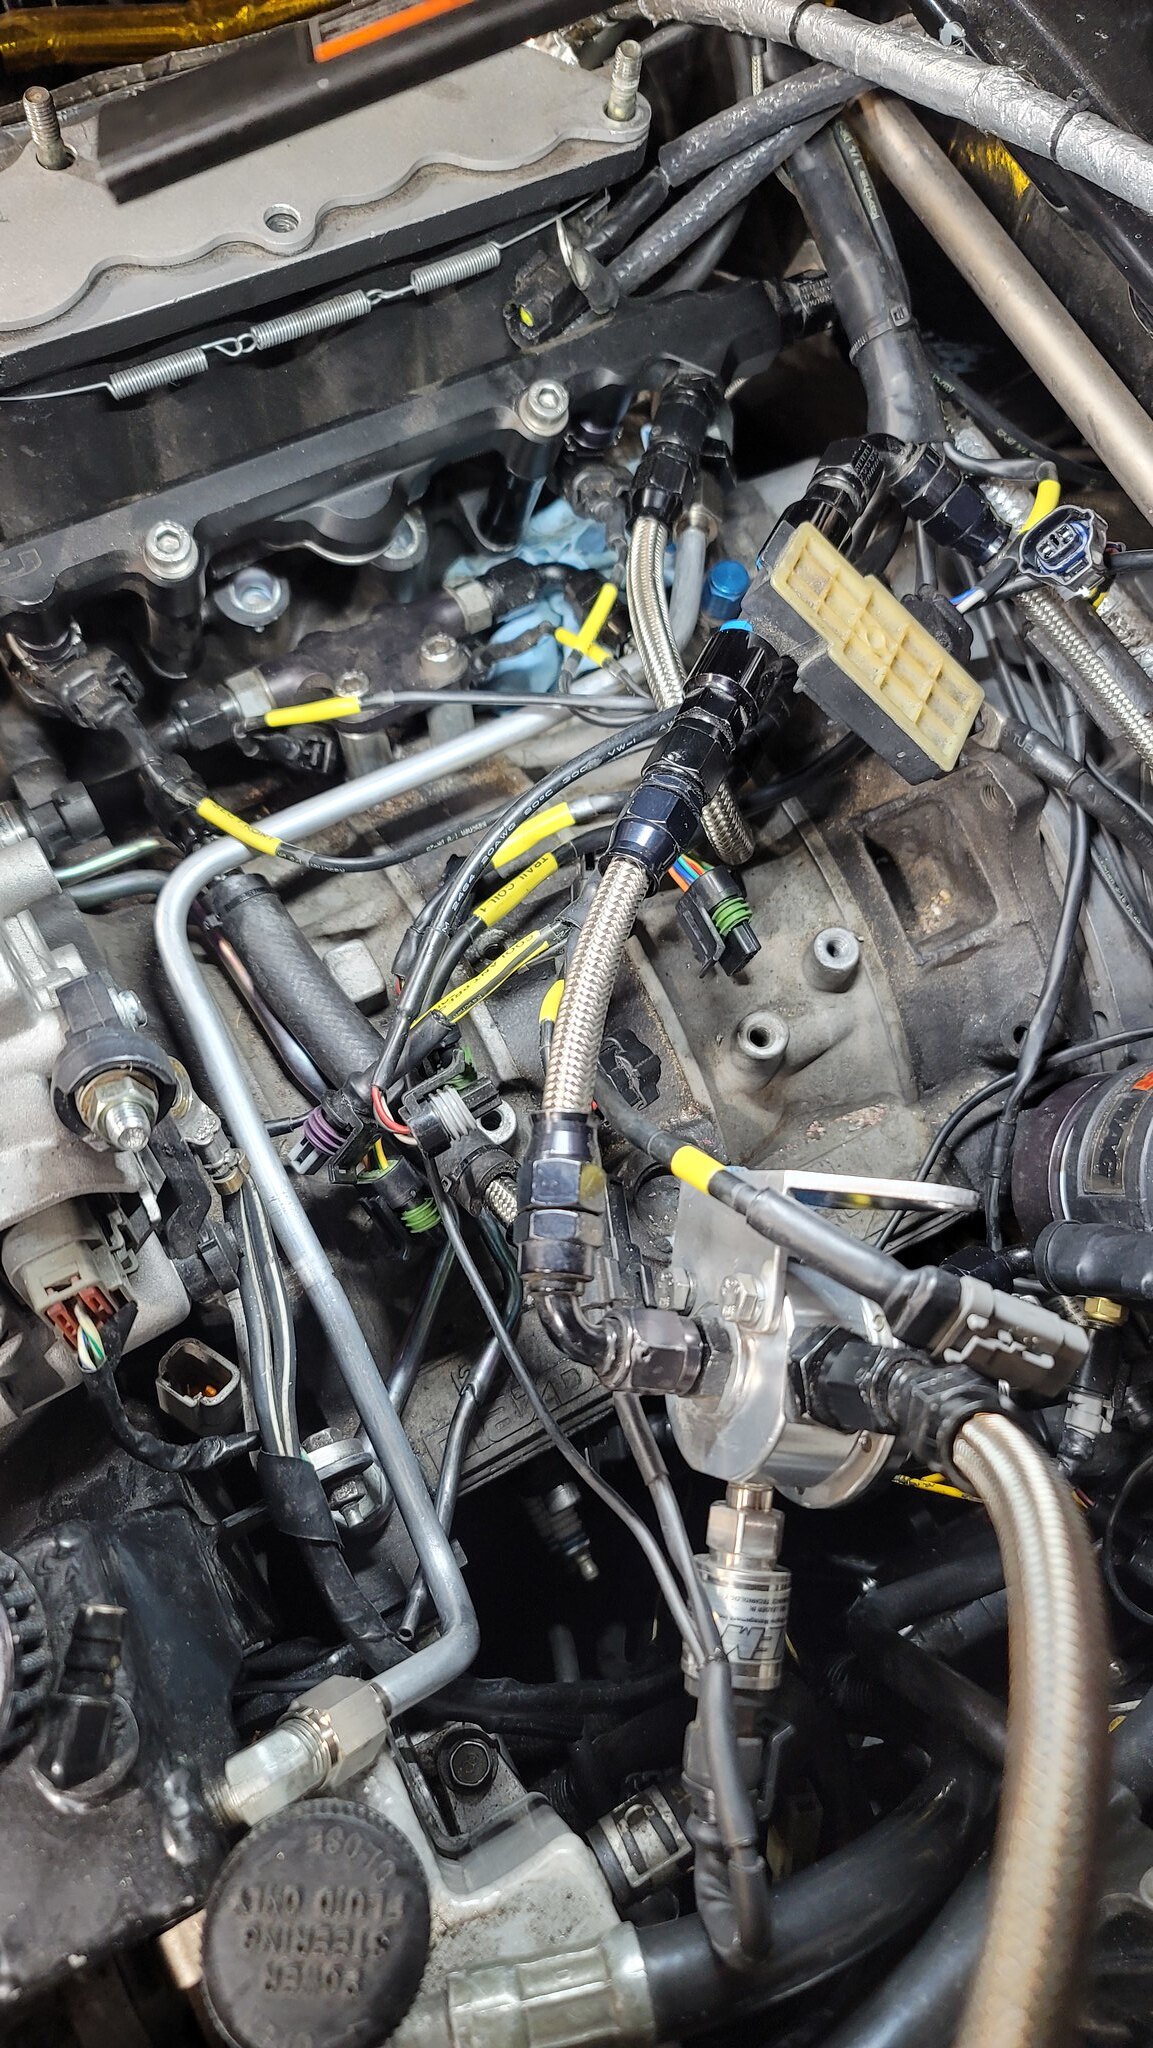
I decided to just paint the lines with high temp paint since getting them nickel plated was goiing to be $135, and I didn't want to wait for powder coat. And if I decided to get them plated at some point it would be more work to remove the powder coat than paint. Well, I scratched the line in a few places when installing it, so it was a waste anyway haha. But I figure I'll get them coated or plated next time they're out.
 20240329_181610 by Eric Jausel, on Flickr
After I installed those lines, I made the one to finish for the oil feed from 316 stainless tube and tube nuts/sleeves. By the grace of God I was able to get it right on the first try. I think I'm going to make a hard line for the recirc vacuum line too, and the fuel lines.
 20240329_201636 by Eric Jausel, on Flickr
I also fired up the car a couple times today and it started pretty easily. So maybe it's still good? LOL
I started mocking up art board pieces to figure out what I need to cut for ducting, but I really should have done it before I installed the radiator. I guess I'll have to remove the front bumper to really get to it.
I decided to just paint the lines with high temp paint since getting them nickel plated was goiing to be $135, and I didn't want to wait for powder coat. And if I decided to get them plated at some point it would be more work to remove the powder coat than paint. Well, I scratched the line in a few places when installing it, so it was a waste anyway haha. But I figure I'll get them coated or plated next time they're out.
20240329_181610 by Eric Jausel, on FlickrAfter I installed those lines, I made the one to finish for the oil feed from 316 stainless tube and tube nuts/sleeves. By the grace of God I was able to get it right on the first try. I think I'm going to make a hard line for the recirc vacuum line too, and the fuel lines.
20240329_201636 by Eric Jausel, on FlickrWho is online
Users browsing this forum: No registered users and 69 guests