DIY: BHR Coil Kit Install (and impressions)
-
Huzer21
DIY: BHR Coil Kit Install (and impressions)
Install tomorrow. Wooo, should be a fun day. I'll make sure to snap some pics.
-
RX-7 Chris
- Posts: 7800
- Joined: Tue Oct 02, 2007 9:14
- Location: Colorado Springs
- Contact:
Thats great. just in time for the dyno day.
1984 RX-7 GSL-SE [size=84]My restomod project[/SIZE]
1964 Ford Galaxie 500XL flat black w/ white interior, 2 dr fastback, 390 thunderbird, C6 auto, 2500 rpm high stall converter, shift kit, AC, Holley 750 cfm
[size=100]RIP 1983 RX-7[/SIZE]
My Car Blog
-
Huzer21
DIY Time:
First: the coils prior to install:
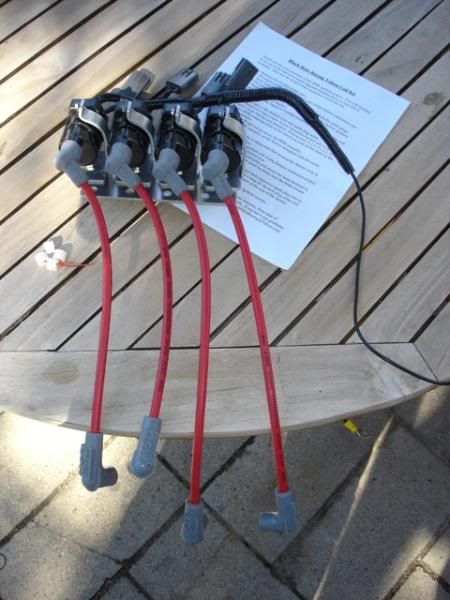
1. Remove intake duct (removing the entire airbox gives you even more room)
2. Disconnect the 4 ignition coil wiring harness connectors. Note the order.
3. Disconnect the plug wires. Remove the wire connected to the bracket as noted in the following picture. Needle nose pliers are your friend.

4. Remove the 4 10mm nuts that secure the factory ignition coils to the factory bracket. An extension for your socket wrench comes in handy.
5. Remove coils and plugs wires.
6. Place the nylon spacers on the studs on the factory bracket.

7. Place the BHR assembly on the factory faceplate.
8. Reinstall the 4 10mm nuts. Torque spec 7-8 ft-lb
9. Connect the 4 coil harness connectors in order, front to rear.
10. Locate a chassis ground, and ground the hoop terminal from the coil wiring harness. (near master cylinder area is easiest)
11. Connect each plug wire. Coil sequence is: L1, T1, L2, T2
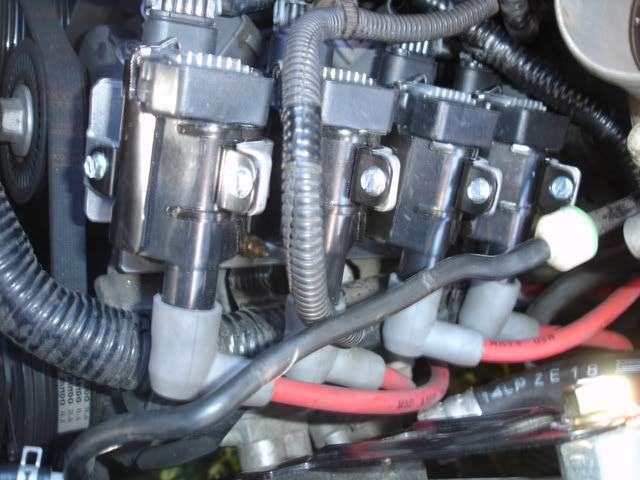
12. Reconnect the intake assembly and you're good to go!
First: the coils prior to install:
1. Remove intake duct (removing the entire airbox gives you even more room)
2. Disconnect the 4 ignition coil wiring harness connectors. Note the order.
3. Disconnect the plug wires. Remove the wire connected to the bracket as noted in the following picture. Needle nose pliers are your friend.
4. Remove the 4 10mm nuts that secure the factory ignition coils to the factory bracket. An extension for your socket wrench comes in handy.
5. Remove coils and plugs wires.
6. Place the nylon spacers on the studs on the factory bracket.
7. Place the BHR assembly on the factory faceplate.
8. Reinstall the 4 10mm nuts. Torque spec 7-8 ft-lb
9. Connect the 4 coil harness connectors in order, front to rear.
10. Locate a chassis ground, and ground the hoop terminal from the coil wiring harness. (near master cylinder area is easiest)
11. Connect each plug wire. Coil sequence is: L1, T1, L2, T2
12. Reconnect the intake assembly and you're good to go!
-
Huzer21
Stock coils are indeed weak. Mine were replaced once under warranty before I even had my car, and I had a known bad one again already. So, bad coils in less than 35k? Yuck!
I can feel a rather significant difference. Prior to the new coils, there was a stutter/hesitation that kicked in around 7-7500. Now, it's just smoooooth all over the place.
I can feel a rather significant difference. Prior to the new coils, there was a stutter/hesitation that kicked in around 7-7500. Now, it's just smoooooth all over the place.
-
GTConversion
- Senior Member
- Posts: 176
- Joined: Wed Oct 15, 2008 9:14
- Location: Colorado Springs
Ranger wrote:Nice writeup. What's the point of doing this? Are the stock coils inadequate?
Stock ones are way weak as Tim said... I'm waiting for my PM letting me know I'm up on the list and payment can be sent whenever..... I have had my ciols replaced twice.... Once last Nov. then again this past July.... For some reason I feel like they are fried again....
GTConversion wrote:Why does the order matter? Just curious..
The Leading and Trailing plugs fire at slightly different times.... eventhough they are used for the same rotor/chamber if that delay is srewed up by not putting them in the right order things could go wrong.
Don't Quote me 100% on that though. But it makes sense. I mean on a normal motor you wouldn't put the plug wires on backwards. You'd hurt the motor and it probably won't start. You'd be getting spark at improper times.

-
goldrocket
- Posts: 857
- Joined: Wed Oct 31, 2007 9:14
- Location: Colorado Springs
- Contact:
Jimmy is correct, Rotary cars have to have a firing order just like boingers. And the leading plug should fire first, the trailing plugs are there to help complete combustion. And the rotors do fire at different times. Ignition timing is also something that has to be precisely controlled to prevent detonation. That causes a lot of damage to rotary engines.
Al says
Anything worth doing is worth overdoing!:eek:

Anything worth doing is worth overdoing!:eek:
-
Huzer21
Huzer21 wrote:Yup, timing is timing. Nothing new in that plug wires go on in a specific order.
Oh, did the plugs at the same time. Easiest just to take off driver's side tire, and go in that way. 13/16" socket, and a long extension, and it's very simple.
Lol... yeah way easy to go through the drivers side trie..... I learned that after I got my car back and a plug wire was off....
So how they feel Tim. Better than the stock?
-
Huzer21
Impressions. I'm not one to blatantly sing the praises of any of my mods, but this one I think has made the biggest "feel" difference. Absolutely no "hesitation" or out-of-breath feeling the car seemed to hit at around 7500 RPM before. Across the board, the car is just smoother and more responsive.
Mileage is up. First mixed city/highway trip today returned an average of 25 MPG. Overall, I'm really impressed. I was expecting to be underwhelmed by this mod, and instead, I'm pleasantly surprised.
Edit: In case you didn't read earlier posts, my case MAY not be typical, as I had at least 1 known bad coil.
Mileage is up. First mixed city/highway trip today returned an average of 25 MPG. Overall, I'm really impressed. I was expecting to be underwhelmed by this mod, and instead, I'm pleasantly surprised.
Edit: In case you didn't read earlier posts, my case MAY not be typical, as I had at least 1 known bad coil.
-
*DarthRX8*
- Posts: 430
- Joined: Fri Oct 17, 2008 9:14
- Location: Stuttgart Germany

-
Huzer21
Who is online
Users browsing this forum: No registered users and 63 guests