Build thread

Talk about your Rotaries!
User avatar
speedjunkie
Senior Member
Posts: 5337
Joined: Wed Jan 02, 2008 9:14
Location: Colorado Springs
Contact:

Re: Build thread

Postby speedjunkie » Fri Jul 22, 2016 9:14

I got the oil pan today. Super fast shipping. And it's absolutely gorgeous! But he forgot the oil drain plugs so he's sending those tomorrow lol.
Image
Image

This piece is to extend the pick up tube to get to the bottom of the tank.
Image
Image

In this pic you can see one of the flapper doors.
Image

I also bought some new rear quarter plastics and center console for the interior from a guy on facebook. They're in mint condition. He also has rear bins that are mint but he wants about $500 for those in addition to the other stuff lol. Plus I don't think I could bring myself to cut the bottoms out of those since they're so nice.

I removed the duct work this afternoon, that was a bit of a pain considering some of the resin ran down the sides of the radiator to where I didn't have it masked off. I'll worry about getting that all removed next time I'm under the car or when I have the radiator removed. The piece looks pretty rough on the inside but it will work, and I'll probably use some resin to fill in low spots so it's nice and flat.
Image
Image

I decided to extend the sides all the way to the end of the top part of the duct, to strengthen the leading edge. That's the only part I worked on today.
Image
Image
Image

User avatar
Shadowden
Posts: 2288
Joined: Fri Aug 05, 2011 9:14
Location: Highlands Ranch
Contact:

Re: Build thread

Postby Shadowden » Fri Jul 22, 2016 9:14

That oil pan is amazing.

User avatar
speedjunkie
Senior Member
Posts: 5337
Joined: Wed Jan 02, 2008 9:14
Location: Colorado Springs
Contact:

Re: Build thread

Postby speedjunkie » Sat Jul 23, 2016 9:14

Yep, it's pretty sweet lol. I'm not planning on installing it until the next time I have the engine out for rebuild again, but I might not be able to wait that long lol. I hope that's a long time off anyway haha. I might pull it out one of these winters to install the pan, Noltec engine mounts, and tranny brace. And maybe do a basic refresh.

I cut off the excess fiberglass and ended up cutting away too much around the exit on the condenser, so I'm going to use a socket and shape some fiberglass around it for strength.
Image
Image

I added two more layers on top and made too much resin so I used most of it and really built it up. I might sand it all down before putting on the final layers to get it as smooth as possible.
Image

I'm still trying to decide about cleaning up the inner parts as well. They won't be visible of course, but anyone that knows me knows how anal retentive I am about stuff like this haha.
Image
Image
Image
Image

User avatar
$crillaTor
Senior Member
Posts: 153
Joined: Sat Jun 15, 2013 9:14
Location: Colorado Springs

Re: Build thread

Postby $crillaTor » Sat Jul 23, 2016 9:14

Go get some Bondo and oodles of sandpaper if you want to be really anal retentive.

User avatar
speedjunkie
Senior Member
Posts: 5337
Joined: Wed Jan 02, 2008 9:14
Location: Colorado Springs
Contact:

Re: Build thread

Postby speedjunkie » Sat Jul 23, 2016 9:14

That's not a bad idea. It would be way easier. Do they have black bondo? Lol

I added the extra material to the front corner, by the condenser exit. And since I made too much resin again I added some to other parts that needed it. But after that I realized that this ducting is going to be blocking air from the rear two inches of the IC. I have to do some brainstorming to find a solution. You can kinda tell in this pic what I'm talking about. What you can't see is that the condenser is almost touching the IC, and I'm pretty sure the ducting WILL be touching it.
Image

Years ago I saw a transparent shift knob with a little rotor inside. Someone on Facebook has one that he's selling...for $275. Yeah, I don't think so. I did some searching and I think I can either make one myself or have it made. More to come on that.

User avatar
$crillaTor
Senior Member
Posts: 153
Joined: Sat Jun 15, 2013 9:14
Location: Colorado Springs

Re: Build thread

Postby $crillaTor » Sun Jul 24, 2016 9:14

Typically when I've used fiberglass for sub-woofer boxes in the past, the only way you're going to get a smooth look is with Bondo. Make the shell with fiberglass (don't even worry about sanding that glass/resin down) then goop the hell out of it with bondo to fill in all the low areas. Let it dry. Sand it down. Use some tacky cloth to get all the particles off of it. Do another round of Bondo. Sand again. The sanding is what takes the longest. You'll start with a low grit and gradually work up to like a 800 grit if you want it really smooth. But yea, then you're going to have to paint it black lol. I don't think they make black Bondo. I've only seen red or a tealish color.

User avatar
speedjunkie
Senior Member
Posts: 5337
Joined: Wed Jan 02, 2008 9:14
Location: Colorado Springs
Contact:

Re: Build thread

Postby speedjunkie » Sun Jul 24, 2016 9:14

Well Jesse suggested I use black paint in the resin so that it's actually black and I may not need to paint it. But if I do paint it and it gets scratched it'll still be black underneath. So I've been doing that, obviously lol. I like the idea of it being super smooth but I'm not sure it's worth it. It's actually not too bad as it is.

User avatar
Shadowden
Posts: 2288
Joined: Fri Aug 05, 2011 9:14
Location: Highlands Ranch
Contact:

Re: Build thread

Postby Shadowden » Sun Jul 24, 2016 9:14

As is typical for me, I'm not following the ducting for your v mount. It looks like you are putting a fiberglass plate on the back side of the intercooler or radiator. Is that right?

If so, are you attempting to channel the air somewhere other than the engine bay? It seems like you wouldn't want to block flow through those pieces.

Nice work on the fiberglassing. I really want to get into fabricating more with fiberglass and carbon fiber. I made a couple of cf pieces for the s2k, but only run one. It is an aluminum/carbon fiber composite piece that is mostly cosmetic, but is also used to mount some things to out of the way. The other one was to replace a normal plastic cover that hides a lot of the wire harness under the intake manifold.

User avatar
speedjunkie
Senior Member
Posts: 5337
Joined: Wed Jan 02, 2008 9:14
Location: Colorado Springs
Contact:

Re: Build thread

Postby speedjunkie » Sun Jul 24, 2016 9:14

With this first piece, it's to direct air through the condenser and radiator by not letting it escape out the gap in the back, or out the sides. If it wasn't for the condenser this piece could have been mounted lower and it would work just fine. Unfortunately I believe the IC will be resting on this duct, so it will block the rear two inches of the IC unless I cut this piece as wide as the IC is or cut the back part off that wide and make another piece to direct the air up through those two inches of IC. If by some miracle it doesn't touch I'll be alright and not have to cut this piece at all. I'm praying for that lol.

I should be getting the AC line tomorrow. But I STILL have to order the refrigerant lol.

I did some troubleshooting on the water injection system today, and got NOWHERE. Basically, for some reason water is not being injected. The lights aren't lighting up on the control box anymore, and they used to at all times, even during idle. The box is getting power, the pump turns on, for some reason it's just not telling the injector to open I guess. I hooked up the laptop and it looked OK. So far I read in the instructions to use the same power that the ECU gets, and that's something I think I changed, but I don't remember for sure. I don't see why that would make that much of a difference though. I also changed to circuit breakers from fuses, but I don't see how that would make a difference either. I didn't hook up the TPS wire, just the RPM wire, but that's the only one I'm using. Maybe that's the problem though. I'm going to look into it more tomorrow. Unfortunately the kit I'm using was sold to Holley a few months after FJO released it, which was back in 2008/2009, and Holley no longer uses the control boxes, they use their ECUs to control the system. I'll email FJO if I have to and pray that they can troubleshoot the control box if I can't figure out anything else. In the mean time I'm going to start looking into other systems to see if there is something else that I can swap in without having to change too much.

I did some test fitting with the OMP HTE-R 400 today, and the super low seat rails I got from Adam Griffith that bolt the seat directly to the floor. Adam said he'd modify the rails for me to work with these seats. The seat has to be to the right a bit, against the tranny tunnel, otherwise the door is still somewhat difficult to close against the shoulder bolster. The rail kept the seat from leaning down too much, so it's leaned back quite a bit. The upside is it gives even more headroom with a helmet, I don't have to take the bottom cushion out. But I'd still rather not have it lean back that far.
Image
Image
Image
Image

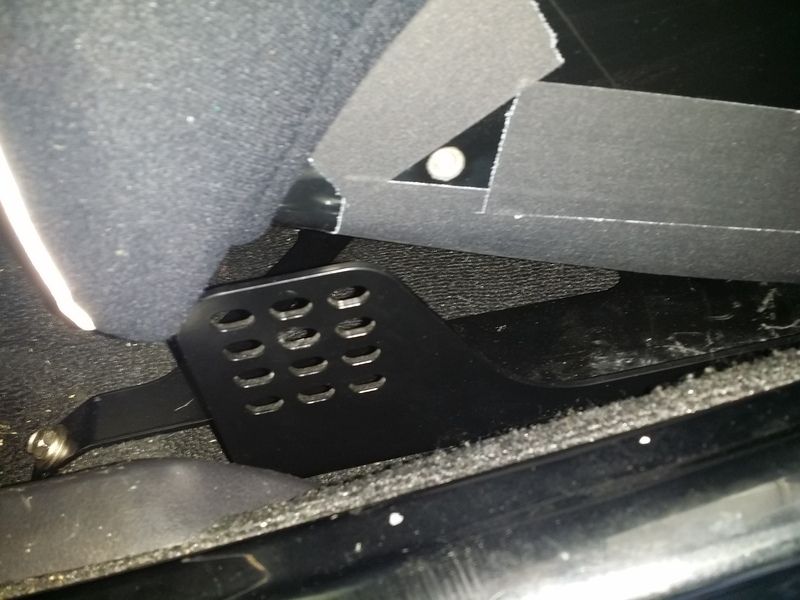
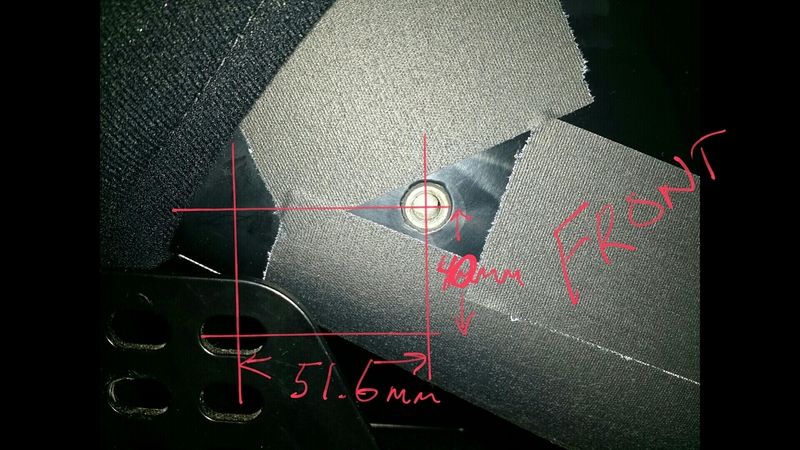
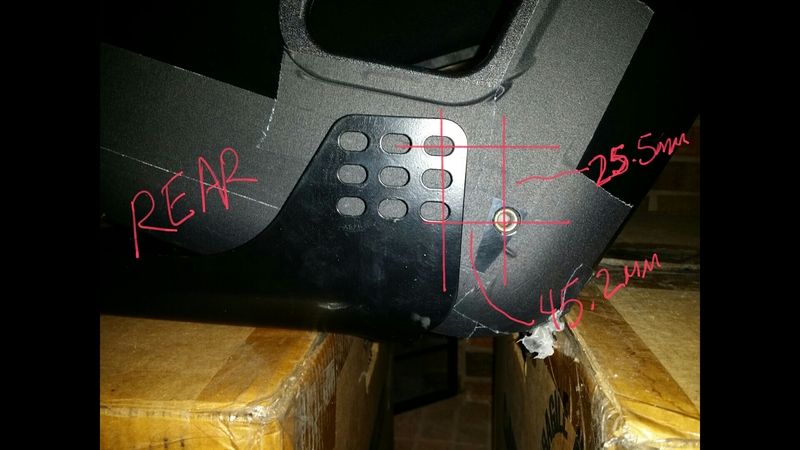
Obviously I had to take this pic outside the car because the ass was back too far to see with it inside the car, and I only took this pic so I could draw on it lol.
Image

User avatar
speedjunkie
Senior Member
Posts: 5337
Joined: Wed Jan 02, 2008 9:14
Location: Colorado Springs
Contact:

Re: Build thread

Postby speedjunkie » Tue Jul 26, 2016 9:14

Yesterday I picked up a new scissor jack for the car. Well, it's used, and it's from a Nissan of some sort, but it's steel so I'm hopeful it will last a long time. It fits pretty well in the stock location too. Obviously it's heavier, and I picked up a second jack that's the same weight as the stock one, but it's smaller and steel with the swiss cheese holes to lighten it. And today I picked up a door panel for the Pathfinder to replace the one Smokey tried to go through because of me haha. I might go back and get the other door panel too because it's a tad different than the original one. I like Best Foreign Auto Parts, I feel they're better than UP&P.

I finished all the AC lines today. I had to drill out the inlet and exit on the dryer, the holes weren't quite big enough for the lines to fully seat. I believe it worked like a champ though. I guess we'll see if it leaks haha. I'm going to pull a vacuum on the system to see if it leaks, then charge it, then do a leak test again. Maybe one of these days I'll order the refrigerant lol.

I messed with the ducting piece a little bit today but tomorrow I plan to cut away the excess material and make it fit over the lines, for which I'll have to do some extra cutting again I noticed today.

User avatar
RX-7 Chris
Posts: 7800
Joined: Tue Oct 02, 2007 9:14
Location: Colorado Springs
Contact:

Re: Build thread

Postby RX-7 Chris » Wed Jul 27, 2016 9:14

The jack from the SA-FB's are steel and they are painted Mazda blue.
1984 RX-7 GSL-SE [size=84]My restomod project[/SIZE]


1964 Ford Galaxie 500XL flat black w/ white interior, 2 dr fastback, 390 thunderbird, C6 auto, 2500 rpm high stall converter, shift kit, AC, Holley 750 cfm

[size=100]RIP 1983 RX-7[/SIZE]

My Car Blog

User avatar
speedjunkie
Senior Member
Posts: 5337
Joined: Wed Jan 02, 2008 9:14
Location: Colorado Springs
Contact:

Re: Build thread

Postby speedjunkie » Wed Jul 27, 2016 9:14

Maybe I'll try to find one of those then lol.

User avatar
speedjunkie
Senior Member
Posts: 5337
Joined: Wed Jan 02, 2008 9:14
Location: Colorado Springs
Contact:

Re: Build thread

Postby speedjunkie » Wed Jul 27, 2016 9:14

I got the oil pan plugs today. Nothing really noteworthy about that lol.

I sanded down and trimmed the excess off the duct piece tonight and then cut some other areas to make it fit, and it fits pretty well. The rear corner sits about 1/4" above the edge of the condenser, and I'm not entirely sure how that is, but I thought I was hosed on fitting the IC because of it. Turns out I have about the same amount of room between the duct work and the IC, WOOHOO! Now I just need to make the ducting for the IC, and I have a couple fresh ideas for that.

I don't know why I keep forgetting about this. A guy on facebook the other night posted some pics of his shift knob he's trying to sell. It's transparent with a rotor and housing inside. I inquired about price and he said he paid $275 for it two years ago. Yeaaaaahhhh, THAT'S a little too much. I saw one of these knobs in a pic years ago and I've been wanting one ever since. Here is the one he has.
Image
Image
Image
Image

Since I refuse to pay $275 for a shift knob, I started doing some research on making them. A guy on youtube who is apparently in love with Super Mario Brothers made one for his truck out of a power up mushroom. It turned out pretty cool. Then on a forum I saw someone mention a company that makes custom knobs. I contacted the company and sent him the pics of this knob and he told me he's pretty sure he made that previous run of knobs. He said he can do them again and if I get 25 or more I can get them for much cheaper. So I'm trying to get some people together, but if not I'll get one or two for myself anyway. I got this rotor keychain years ago just in case I ever discovered how to do it myself, but I'm thinking about this rotary heart keychain instead, the old symbol off the front grill of one of the old cars (I don't remember which one, the RX-3 maybe?). I think that would look AWESOME. Then there are the red, blue, and silver keychains that could be used too. And if people want the rotor and housing like the other knob he would probably do that too. I'm checking on the weight of the knobs for some of the guys, he hasn't emailed me back yet. The only difference in this run would be that the knob is just a round ball, it won't have the neck like the other one does.
Image
Image
Image
Image

User avatar
speedjunkie
Senior Member
Posts: 5337
Joined: Wed Jan 02, 2008 9:14
Location: Colorado Springs
Contact:

Re: Build thread

Postby speedjunkie » Tue Aug 02, 2016 9:14

I took the car to PCS Motorsports today to get it tuned. And at one point it almost had a future date with a baseball bat, axe, gasoline and a match, and a crusher.

Travis had it on the rollers and I guess he killed it while trying to take off. Click. Click. Click. Click. About 100 times, at least. He had already gotten out after about 30 clicks so he could turn the fan off because he couldn't hear it if it had been trying to start. So I got in the seat and gave it at least another 70 tries. I tried popping the circuit breaker just to see, no luck. Finally it started cranking, and was cranking slowly. AAARRRRRRRGGGGGHGHHHHHHHH!!!!!!!!!!!!!!!!!!! And the CB popped a couple times on it's own from cranking too long and I had to wait to be able to close it again. He put a charger on the battery and we tried jumping the car, still cranking slowly. Then he left it on low charge and after that it fired up just fine. Then I realized before all that, one of the guys had walked up and said nice car and I said "well it's no Porsche but she gets me around and we have fun." I swear it has a soul, and it is a jealous bitch sometimes.

He didn't finish sorting out the tune before the end of the day so I left it there and he's going to finish it in the morning.
Image
Image
Image

The refrigerant is supposed to be here Wednesday, and I'm trying to meet with the guy that makes the shift knobs on Friday while he's in Denver this week.

User avatar
RX-7 Chris
Posts: 7800
Joined: Tue Oct 02, 2007 9:14
Location: Colorado Springs
Contact:

Re: Build thread

Postby RX-7 Chris » Tue Aug 02, 2016 9:14

Any luck with this?
1984 RX-7 GSL-SE [size=84]My restomod project[/SIZE]


1964 Ford Galaxie 500XL flat black w/ white interior, 2 dr fastback, 390 thunderbird, C6 auto, 2500 rpm high stall converter, shift kit, AC, Holley 750 cfm

[size=100]RIP 1983 RX-7[/SIZE]

My Car Blog


Return to “Rotary Vehicle”

Who is online

Users browsing this forum: No registered users and 43 guests