Build thread

Talk about your Rotaries!
FDEEZ
Senior Member
Posts: 235
Joined: Sun Aug 11, 2013 9:14
Location: Colorado Springs

Re: Build thread

Postby FDEEZ » Mon Apr 20, 2015 9:14

Got bored...built you a 3D Model of your IC. I modified it a tad by rounding off the corners on the left end tank...you know, for better airflow.

I even beaded the end pipes for you :-)

Image

User avatar
speedjunkie
Senior Member
Posts: 5337
Joined: Wed Jan 02, 2008 9:14
Location: Colorado Springs
Contact:

Re: Build thread

Postby speedjunkie » Tue Apr 21, 2015 9:14

LOL thanks! I went to Mitch's tonight actually so he could weld a 10AN fitting onto the turbo oil drain. I picked up a straight 10AN fitting for the oil drain but I need to go back and get a 45 degree version for it to work. Jason came over after work and we brazed the brass fittings on the aluminum lines, then I wrapped them in heat barrier tape and installed them. I got the turbo back in and most of that assembly fully installed, but I'm waiting on the new fitting to finish the turbo part.

Last night I ordered all the Teflon lines and fittings to make the new fuel lines. I got Fragola pieces for $378 from Summit. WAY better than what I would have paid. I'll build those and install them this weekend probably, and Mitch said he'd be ready this weekend to bring the IC over to figure out how to finish the end tanks. I'll hopefully try to start it again this weekend too.

User avatar
Shadowden
Posts: 2288
Joined: Fri Aug 05, 2011 9:14
Location: Highlands Ranch
Contact:

Re: Build thread

Postby Shadowden » Tue Apr 21, 2015 9:14

Nice progress. Do you use AN fittings for the teflon fuel lines?

User avatar
speedjunkie
Senior Member
Posts: 5337
Joined: Wed Jan 02, 2008 9:14
Location: Colorado Springs
Contact:

Re: Build thread

Postby speedjunkie » Tue Apr 21, 2015 9:14

Shadowden wrote:Nice progress. Do you use AN fittings for the teflon fuel lines?


Yes, although they are a bit different than normal AN fittings due to the way it's assembled.

User avatar
speedjunkie
Senior Member
Posts: 5337
Joined: Wed Jan 02, 2008 9:14
Location: Colorado Springs
Contact:

Re: Build thread

Postby speedjunkie » Tue Apr 21, 2015 9:14

I picked up the 45 degree 10AN fitting from Whisler Bearing and some more Oetiker clamps from Lowes. I made the oil drain line tonight and finished installing the turbo area parts. Here are pics from last night and tonight.

This is basically what I had Mitch do last night. Although the fitting is gold now due to the heat lol.
Image
Here are the brazed and heat wrapped lines.
Image
Image
Image
And finally installed. The support clamp on the tall line works pretty well.
Image
Image

And some shots from tonight. I installed the UIM so I could make the vacuum lines for everything and know they would be the right length.
Image
Image
I also heat wrapped the vacuum lines that will be right next to the turbos. I'm not entirely crazy about the routing of the longer line, but I can't think of a cleaner way to run it just yet. Maybe I'll use an Adel clamp off the front/side UIM bolt to hold it close to the UIM/LIM.
Image

As soon as I get the fuel lines I'll build them and see if this thing starts normally.

User avatar
Shadowden
Posts: 2288
Joined: Fri Aug 05, 2011 9:14
Location: Highlands Ranch
Contact:

Re: Build thread

Postby Shadowden » Wed Apr 22, 2015 9:14

Good Luck. When do you think you will have the lines in hand? Anything else you can button up while you wait, or does it need to stay partially disassembled until the startup is verified?

User avatar
speedjunkie
Senior Member
Posts: 5337
Joined: Wed Jan 02, 2008 9:14
Location: Colorado Springs
Contact:

Re: Build thread

Postby speedjunkie » Wed Apr 22, 2015 9:14

Shadowden wrote:Good Luck. When do you think you will have the lines in hand? Anything else you can button up while you wait, or does it need to stay partially disassembled until the startup is verified?


Thanks! I got most of the lines and fittings today actually. I'm still waiting on six straight 6AN fittings but should have those by Friday. I'm leaving it partially disassembled until after I try to start it, but I'm getting too close to needing to take it to Indiana that I should just put it all back together regardless.

I also forgot to mention that I pumped the old gas out of the tank the other night and there was barely any pressure from the pumps. Really not feeling good about that.

User avatar
speedjunkie
Senior Member
Posts: 5337
Joined: Wed Jan 02, 2008 9:14
Location: Colorado Springs
Contact:

Re: Build thread

Postby speedjunkie » Wed Apr 22, 2015 9:14

I built four of the fuel lines and installed three of them, from the tank to the filters and the return line.
Image

Here is the other line I made, the 8AN one, but I still need to get the other six straight fittings so I can make the other two lines for this assembly. I think these things are even easier to build than regular lines, although I haven't pressure tested them yet obviously lol. And in this pic you can tell how much slimmer the teflon line is than the rubber line of the same size.
Image

These two pics show the pieces that make up a teflon fitting and how they go together.
Image
Image

I looked at the driver's side to see if I had a connector for a rear speaker and I didn't find one. However, I found a connector on the passenger side that might be the right one. I'm just wondering why there wouldn't be one on both sides. So it leads me to believe this isn't a speaker connector, but I'm not sure what else it could be for.
Image
Image
Image

I looked at the battery situation again and I think I'm just going to drill a couple new holes at the ends of the battery and put the bracket across the top longways. It's about the only way I can think to do it.

User avatar
speedjunkie
Senior Member
Posts: 5337
Joined: Wed Jan 02, 2008 9:14
Location: Colorado Springs
Contact:

Re: Build thread

Postby speedjunkie » Thu Apr 23, 2015 9:14

I got the rest of my fittings today and I was just about to finish the lines when I decided I wanted to change the location of the flex fuel sensor, and therefore I need two more straight fittings and I just ordered those. ARGGGGHHHH! They should be here 29-30 April. Dammit.

I think I figured out how I'm going to secure the battery too.

User avatar
speedjunkie
Senior Member
Posts: 5337
Joined: Wed Jan 02, 2008 9:14
Location: Colorado Springs
Contact:

Re: Build thread

Postby speedjunkie » Sat Apr 25, 2015 9:14

This afternoon I went back to Whisler Bearing and picked up the two 6AN fittings I needed for the teflon lines, but they're stainless steel and a couple parts are possibly brass, so I'm not cool with that. I made the last line to go from the FPR to the return hardline, but I'll be remaking it in two lines with the flex fuel sensor in the middle once the two fittings get here next week. Here is the sensor with the fittings I got from 3R. I'm not really crazy about them, I'd rather have the Swagelok tube fittings but I can't figure out where to get them. These will do for now at least.
Image

Mitch sent me these pics today. He's going to tack them together and bring the IC over tomorrow to test fit it.
Image
Image

Tomorrow I'm going to get some gas and try to start the car. I guess we'll see what happens. I think I'll finish the battery ordeal too so I can install the rear bins and quarter panels for good.

User avatar
Shadowden
Posts: 2288
Joined: Fri Aug 05, 2011 9:14
Location: Highlands Ranch
Contact:

Re: Build thread

Postby Shadowden » Sat Apr 25, 2015 9:14

I like that end piece.

User avatar
speedjunkie
Senior Member
Posts: 5337
Joined: Wed Jan 02, 2008 9:14
Location: Colorado Springs
Contact:

Re: Build thread

Postby speedjunkie » Sun Apr 26, 2015 9:14

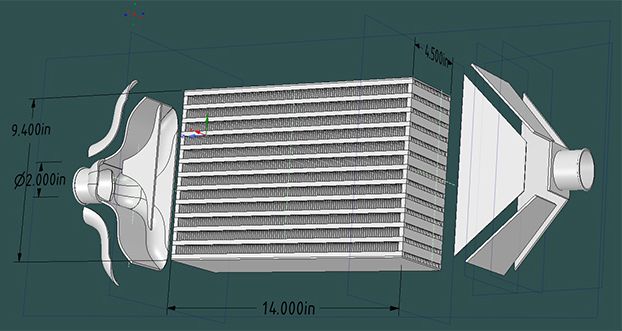
Thanks! I like it too. He brought the IC over today with the end tanks tacked up. We're going to just put the inlet and outlet at the bottom plate on both sides, and then just angle them where they need to go. He's also going to make the piping in sections so it'll look cool lol. We got the car running Saturday too. It's running on the Adaptronic and actually fires up easier than ever before, providing you blip the throttle once as you're cranking lol. My only concern is that it's running on the premise that the internal MAP sensor is selected when it's using the GM 3 bar. But honestly this doesn't really matter since I'm doing a new ECU anyway. I finished the battery hold-down, installed the rear bins and quarters, and tonight I built the Ohlins and pulled the STANCE coilovers. I'll be installing the Ohlins before I leave, but I'm trying to decide if I want to go ahead and do the Swift springs and install the brakes and everything else at the same time, or just wait for that stuff until I get back. I really don't want to pull these things twice in such a short time, but I would like to compare the two different springs. I hate to install such nice clean coilovers in such a nasty area, but I'm not sure I'll have time to get everything done before I leave. Here are some videos of it running.
https://www.youtube.com/watch?v=uo79vqgYro4
https://www.youtube.com/watch?v=1SWvJ-bknKM

Kevin used the turbo as a hair dryer lol.
https://www.youtube.com/watch?v=80NZPlKZ2ts

Zico's guy came over and pulled the windshield Saturday too. He's supposed to come over and install the new one tomorrow. Once I decide what I'm going to do with the coilover project, I'll knock that out and put the fenders on, etc.

The rest of the AC vent got shipped today, so I'll fix that when it gets here and install the dash. I'd like to install it while the windshield is out lol, but I don't think that's gonna happen. I'm also going to see if I can find an iPad Mini 2 and start mocking that up in the dash while it's out.

Oh, and the slow cranking issue wasn't evident the first few times we started the car, but it showed itself a couple times later. So I'm not sure what that is but at least it starts correctly most of the time.

We also burped the coolant system, and it erupted like a volcano out of the Lisle funnel at one point lol. Turns out hot coolant really cleans an engine bay pretty well lol.

User avatar
speedjunkie
Senior Member
Posts: 5337
Joined: Wed Jan 02, 2008 9:14
Location: Colorado Springs
Contact:

Re: Build thread

Postby speedjunkie » Mon Apr 27, 2015 9:14

I didn't get home til about 8 tonight so I only did a couple things. My two fittings from Summit came in so I remade the return line with the flex fuel sensor in place and reinstalled the UIM. That's just about it lol. I think tomorrow night I'll install the Ohlins, wheels, fenders, and put the car back on the ground. Although I still need to install the hood (and line up the hood pins again), so that would be easier with the fenders off.

I looked at O'Reilly, Autozone and Advance for the little clips that hold the brake line in the bracket, but I haven't found it anywhere. I know Simon got them somewhere, but I don't know where. Maybe NAPA.

I also spoke with Jonathan Bruce of Gorilla RE for about an hour earlier and I told him about the slow cranking issue. He said he usually installs four or five ground cables from the battery to different places around it and he said it makes a big difference, so I guess I'll be removing the rear quarters again lol.

And last night I paid for the ECU and everything else from Ludwig. No turning back now lol.

User avatar
Shadowden
Posts: 2288
Joined: Fri Aug 05, 2011 9:14
Location: Highlands Ranch
Contact:

Re: Build thread

Postby Shadowden » Wed Apr 29, 2015 9:14

What size cable did you run from the battery to the starter? Just thinking that if you have a longer run than stock, then you will lose more power if you didn't upsize the cable. That whole V/r=i thing.

I always figured a quality ground was a quality ground. Definately curious as to what resolves the cranking issue for you.

User avatar
RX-7 Chris
Posts: 7800
Joined: Tue Oct 02, 2007 9:14
Location: Colorado Springs
Contact:

Re: Build thread

Postby RX-7 Chris » Wed Apr 29, 2015 9:14

I don't see why you would need all that grounding. It isn't really going to need that much more cranking power than my car and it is running 4 ga cables. A single set of 2 ga cables should be enough. Where the problem usually happens is the grounding connections. Clean the connections really well and use dielectric grease.
1984 RX-7 GSL-SE [size=84]My restomod project[/SIZE]


1964 Ford Galaxie 500XL flat black w/ white interior, 2 dr fastback, 390 thunderbird, C6 auto, 2500 rpm high stall converter, shift kit, AC, Holley 750 cfm

[size=100]RIP 1983 RX-7[/SIZE]

My Car Blog


Return to “Rotary Vehicle”

Who is online

Users browsing this forum: No registered users and 44 guests